


Cleaning your fire pit is pretty straightforward: wait for it to cool down completely, scoop out the ash, give the inside a good scrub with a wire brush and some soapy water, and then rinse it clean. This simple routine keeps it looking sharp and makes sure it’s running safely and efficiently for your next get-together.
Why a Clean Fire Pit Is a Better Fire Pit
A fire pit is the heart of any great backyard hangout, but it doesn’t take long for soot and ash to turn it into an eyesore if you let it go. This guide will walk you through the entire cleaning process, turning it into a simple—and honestly, pretty satisfying—chore. We’ll cover the essential tools and the right techniques for whatever your pit is made of, from rugged steel to elegant stone.
You’ll quickly see why regular cleaning isn’t just about looks; it’s about performance. Getting rid of old ash improves airflow and heat, and a little care goes a long way in preventing rust, which means your investment will last for years to come. Think of it as basic maintenance that pays off with better fires and a centerpiece that’s always ready for action.
The Real Impact of Skipping a Cleanup
Look, we all get it. It’s tempting to just leave the ashes for “next time.” You’re not alone in that. Research actually shows that about 67% of people with outdoor fire features only do a deep clean once or twice a season.
But that common habit has a real downside. Burner manufacturers have found that just a one or two-inch layer of packed-down ash can choke off airflow and slash your heat output by as much as 15–25%. That means you’re burning more wood just to get the same amount of warmth. A quick scoop of the cooled ash after each fire can bring back most of that lost efficiency. You can dig deeper into the latest trends in the outdoor fire pit market report.
Before we jump into the specific steps for wood-burning and gas models, let’s get your toolkit sorted. Having the right gear on hand makes the whole process faster and safer.
Key Takeaway: Consistent cleaning is more than just keeping up appearances. It directly affects your fire pit’s heat output, how much fuel you burn, and how long it lasts. It’s a non-negotiable part of owning one.
By making this a simple habit, you ensure your fire pit is always ready to go, giving you the best possible experience every single time you light it up. Now, let’s look at exactly what you’ll need to get the job done right.
Your Essential Fire Pit Cleaning Toolkit
Having the right tools on hand makes all the difference between a quick, easy cleanup and a frustrating chore. Here’s a rundown of the must-have items that will handle just about any fire pit cleaning job, whether you’re dealing with wood ash or gas burners.
| Tool | Primary Use for Wood Pits | Primary Use for Gas Pits |
|---|---|---|
| Shovel or Trowel | Scooping out large amounts of cooled ash and debris. | Removing leaves, twigs, and other debris from the burner area. |
| Shop Vacuum | Sucking up fine ash dust and small particles left after shoveling. | Clearing fine dust and small debris from around burner ports and lava rocks. |
| Stiff Wire Brush | Scrubbing away stubborn soot, creosote, and rust from the interior walls. | Gently brushing away soot from lava rocks, logs, and burner components. |
| Bucket | Holding soapy water for scrubbing or carrying away ash. | Holding soapy water; useful for soaking lava rocks or fire glass. |
| Heavy-Duty Gloves | Protecting hands from sharp edges, soot, and cleaning solutions. | Protecting hands while handling potentially sharp lava rocks or fire glass. |
| Mild Dish Soap | Creating a simple, effective cleaning solution for scrubbing the pit’s interior. | A safe cleaner for the exterior, fire glass, and ceramic logs. |
| Soft Cloths/Sponges | Wiping down the exterior and applying protective coatings. | Wiping down the exterior, control knobs, and gas lines. |
| Safety Goggles | Protecting eyes from flying ash, dust, and cleaning product splashes. | Protecting eyes from dust when cleaning burner media. |
With these basics in your garage or shed, you’ll be prepared for everything from a quick post-fire tidy-up to a full-blown seasonal deep clean.
Tackling Your Wood-Burning Fire Pit Cleanup
Cleaning a classic wood-burning fire pit is mostly about managing ash and soot. But there’s a right way and a wrong way to do it, and getting it right keeps you safe and your patio looking sharp. The whole process starts with one non-negotiable rule: patience.
You have to wait until the ashes are completely cold to the touch. This isn’t a suggestion—it’s a must. That usually means giving it a full 24 hours after the last ember has died out.
Rushing this is a rookie mistake with serious consequences. Ashes that look gray and dead on the surface can easily hide hot embers underneath, ready to ignite a fire in your trash can or compost pile. I always give the ash a gentle stir with a metal shovel just to be absolutely sure it’s cool.
This infographic breaks down the essential prep work before you even think about scooping ash.
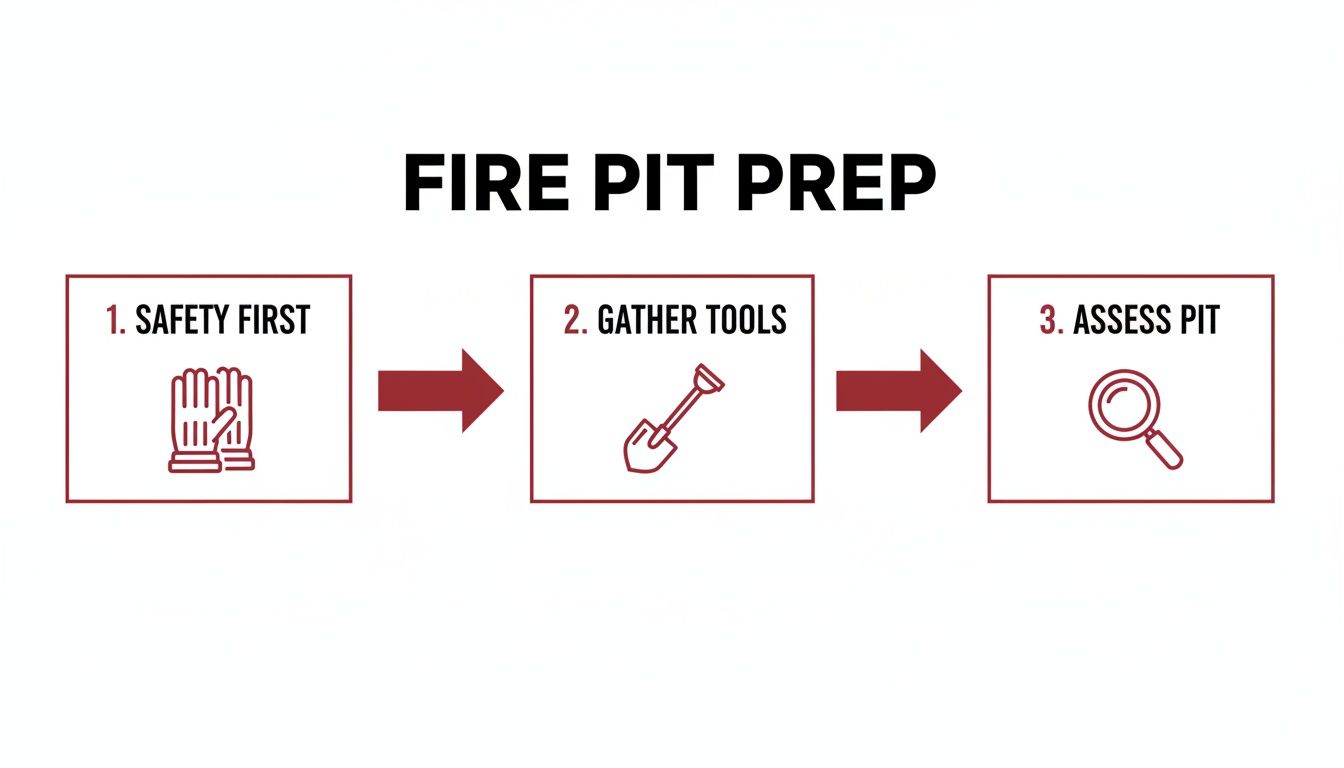
This simple three-step approach—Safety First, Gather Tools, Assess Pit—is the perfect way to kick off a smooth and effective cleaning session every time.
Safely Removing and Disposing of Ash
Once you’re confident the ashes are cold, the real work begins. Grab a small metal shovel or trowel and scoop the bulk of the ash into a metal bucket. Never use plastic for this; a single hidden ember could melt right through it. To keep the dust from flying everywhere, scoop slowly and hold the bucket close to the fire pit’s edge.
For that fine layer of dust that always gets left behind, a shop vac is your best friend. It’ll suck up the last bits of residue in seconds, leaving the bowl ready for a deeper scrub. If you don’t have one, a damp cloth will do the trick, though it’s definitely a messier job.
Proper disposal is just as critical as removal. Don’t just dump the ashes in your garden or trash bin.
- Metal Ash Can: Always put cooled ashes into a metal container with a lid that seals tightly.
- Safe Storage: Keep the can on a non-flammable surface like concrete or dirt, well away from your house, deck, or anything else that could catch fire.
- Wait Before Disposing: Let the ashes sit in the sealed can for a few days before you even think about adding them to your regular trash. It’s the only way to be 100% certain no heat remains.
This careful approach is all about safety. The U.S. Fire Administration often points out that stray embers from outdoor fires are a leading cause of preventable property damage. Safe ash disposal isn’t just a chore; it’s a critical habit.
Scrubbing the Interior Bowl for a Deep Clean
With the ash gone, it’s time to deal with the stubborn soot and grime baked onto the interior. A stiff-bristled wire brush is the perfect tool for the job. Get in there and scrub in circular motions, working away the black residue from the walls and floor of the pit.
For tougher gunk, a simple cleaning solution works wonders. Just mix a bit of mild dish soap with warm water in a bucket. Dip your brush into the soapy water and get back to scrubbing. The soap is great for lifting the greasy deposits that come from things like marshmallows or hot dogs.
After a solid scrub-down, rinse the entire interior with a garden hose. Make sure you wash away every last bit of soap, as any residue can create some nasty fumes during your next fire.
Finally, let the fire pit air dry completely before using it again or putting the cover on. Trapped moisture is the number one enemy of metal fire pits and the fastest way to start a rust problem.
This kind of hands-on maintenance is a big reason why cleaning habits are so tied to what’s popular in the market. Industry analysis shows the global fire pits market, currently valued at around USD 7.7 billion, is expected to skyrocket to USD 14.9 billion by 2034. Within that boom, traditional wood-burning models—the ones needing the most ash and soot management—make up about 42.7% of all products. That’s millions of households learning the ropes of fire pit cleaning each season.
Choosing the right fuel can also cut down on your cleaning time. For tips on minimizing residue from the start, check out our guide on the best wood for a fire pit.
Tackling a Gas Fire Pit Cleanup
Gas fire pits are incredibly convenient, but “low maintenance” isn’t the same as “no maintenance.” You get to skip the messy ash and soot that comes with a wood-burning pit, but a little upkeep is still key for safety, performance, and keeping it looking sharp.
The good news? Learning how to clean your gas fire pit is a straightforward job that ensures it lights up reliably every single time you want that instant ambiance.
First things first: safety. Before you touch anything, you have to completely shut off the gas supply. Whether that’s the valve on your propane tank or the main gas line key for your house, turn it off. Then, double-check that every knob on the fire pit itself is in the “off” position. Give the whole unit plenty of time to cool down.
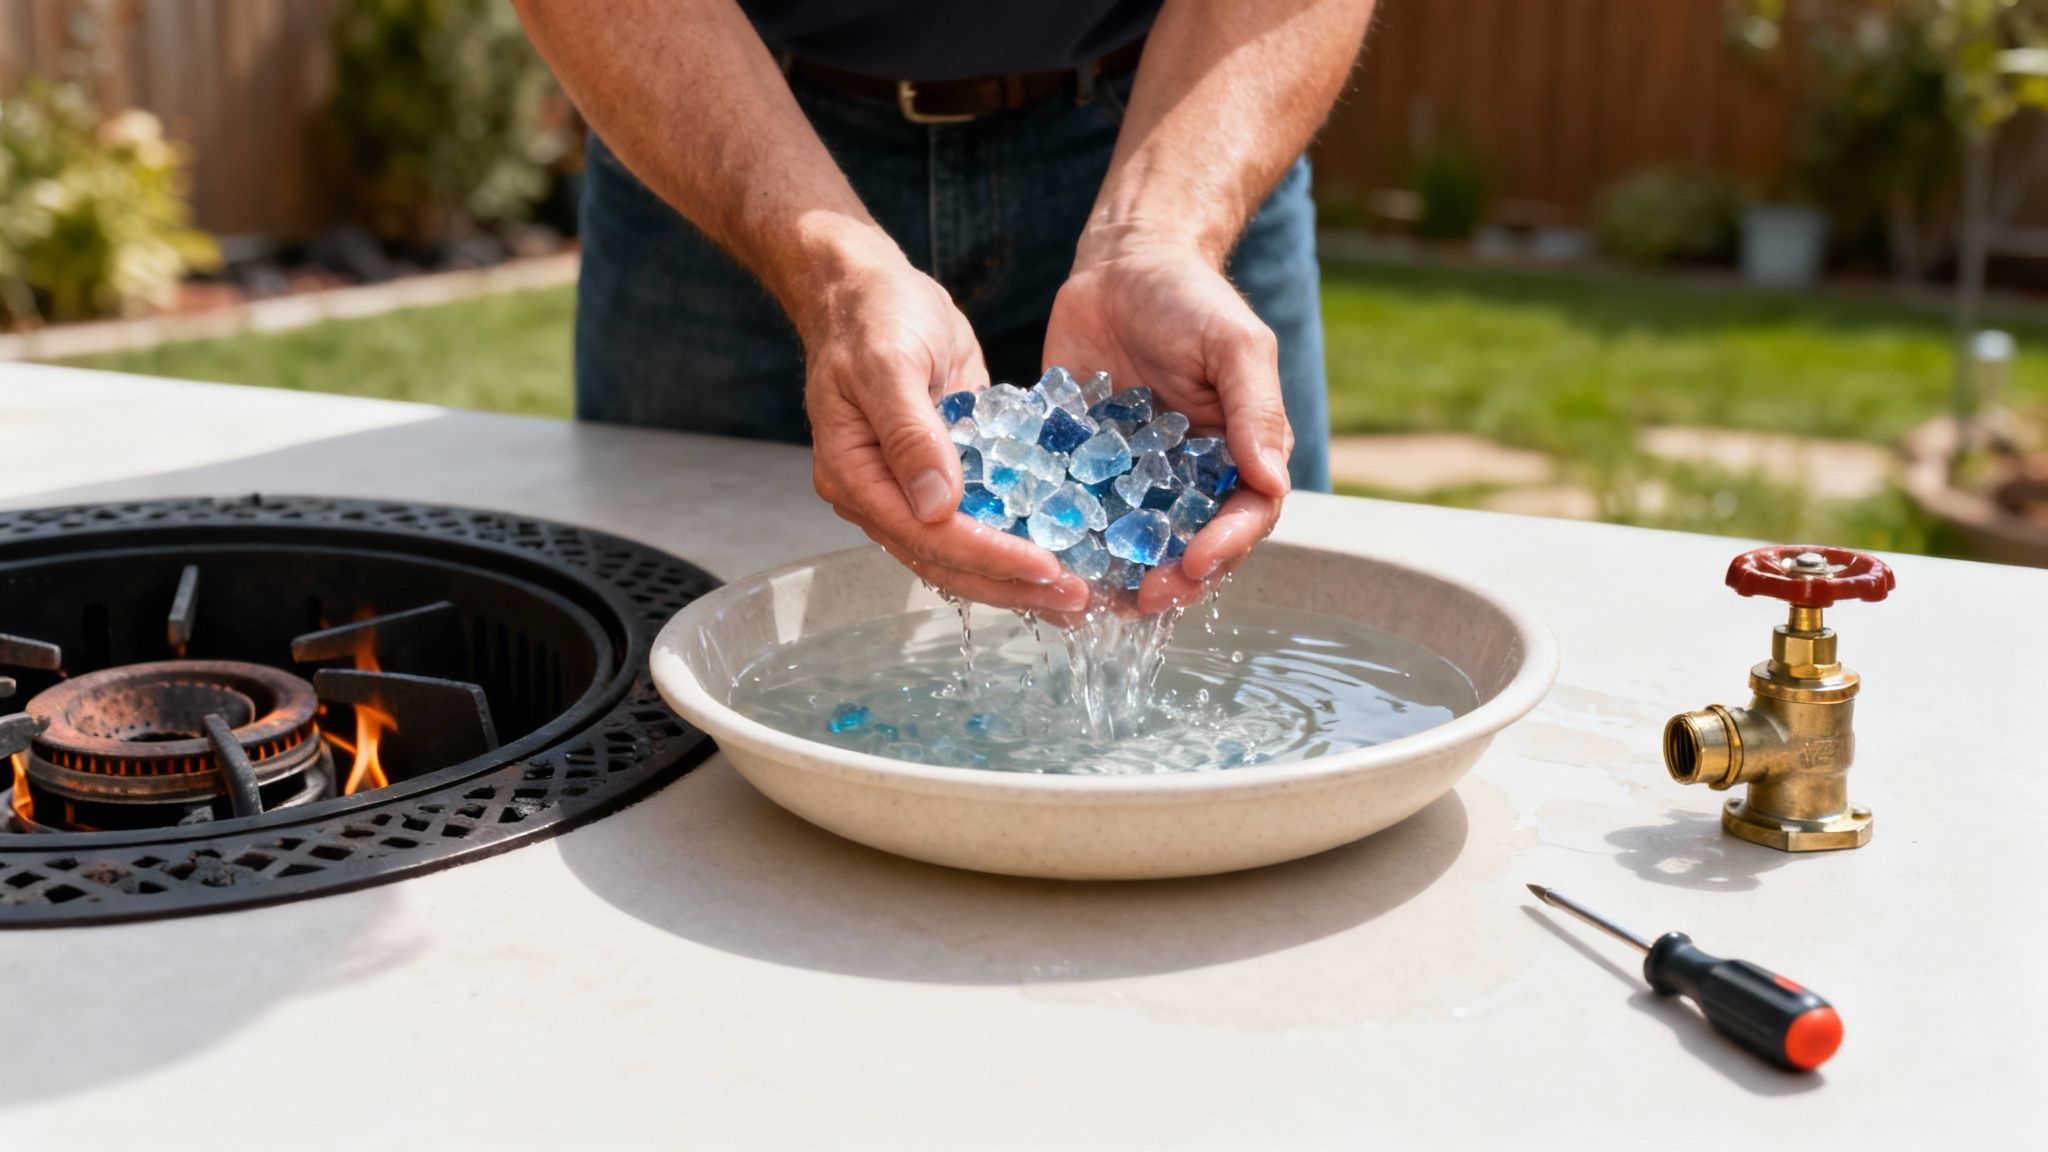
Cleaning the Fire Glass and Lava Rocks
Your fire media—the lava rocks, fire glass, or ceramic logs—is what everyone sees first. It’s also where dust, fallen leaves, and cobwebs love to hang out. A dirty media bed doesn’t just look bad; it can mess with how your flames look and perform.
Start by carefully scooping the media out of the fire pit pan. A tarp or a big bucket works great for holding it all.
- For Fire Glass: Mix a little mild dish soap with warm water. Let the glass soak for a few minutes, then give it a thorough rinse with clean water until every bit of soap is gone.
- For Lava Rocks & Ceramic Logs: A soft-bristled brush is your best friend here. Gently scrub away any dust or light soot. Try to avoid using soap on these, as they’re porous and can absorb it. A good rinse is usually all they need.
The most critical step here is letting the media dry completely before you put it back. Trapped moisture can cause lava rocks to crack or even pop when they get hot—a lesson many people learn the hard way. Spread them out on a towel in the sun for a few hours just to be safe.
Inspecting the Burner and Ignition System
With the media out of the way, you’ve got a clear view of the heart of your fire pit: the burner. This component is the usual suspect when you’re dealing with uneven flames or ignition problems.
Grab a shop vac with a brush attachment or a can of compressed air to gently clear any debris from the burner ring and its ports.
Take a close look at the small gas ports. If you see any clogged with dirt or insects (it happens!), use a toothpick or a paperclip to carefully clear the blockage. Never use anything that could break off inside the port.
Next, check out the igniter. It’s usually a small metal box with a ceramic-insulated electrode sitting near the burner. Gently wipe it with a dry cloth to get rid of any grime. Make sure the electrode isn’t bent or touching the burner, as that can stop it from creating a spark.
Wiping Down the Exterior Surfaces
The final step is cleaning up the outside of your fire pit. The method you use really depends on the material it’s made of. For most surfaces, a soft cloth with warm, soapy water is all you’ll need.
If your fire pit has stainless steel parts that need some extra TLC, there are specific techniques that work best. For a detailed guide, you can learn more about how to clean stainless steel and get it looking brand new.
Once it’s clean, rinse away any soap residue with a damp cloth and dry the entire unit thoroughly with a clean towel. A clean exterior not only looks better but also helps you spot potential issues like cracks or rust before they turn into bigger problems. This simple routine, done once or twice a season, will keep your gas fire pit safe, beautiful, and ready for your next backyard get-together.
How to Banish Rust and Stubborn Soot Stains
Even the most well-loved fire pit is going to face challenges beyond simple ash and dust. Sooner or later, you’ll spot it: the dreaded orange-brown flakes of rust creeping across a metal bowl, or deep, black soot stains that seem baked into porous stone. These can feel like permanent problems, but they’re not. Think of this as your troubleshooting guide for when the stubborn stuff shows up.
Ignoring these issues isn’t just about looks; it’s about the life of your fire pit. Honestly, a consistent cleaning routine can realistically double its lifespan. Corrosion data shows that an unprotected steel bowl with wet ash left inside can start showing visible rust in as little as 6–8 weeks in humid weather. Field tests have shown that when owners are diligent about cleaning, the failure rate from severe rust drops by a whopping 40–60% over five years. You can find more insights on the outdoor fire pits market if you’re curious.
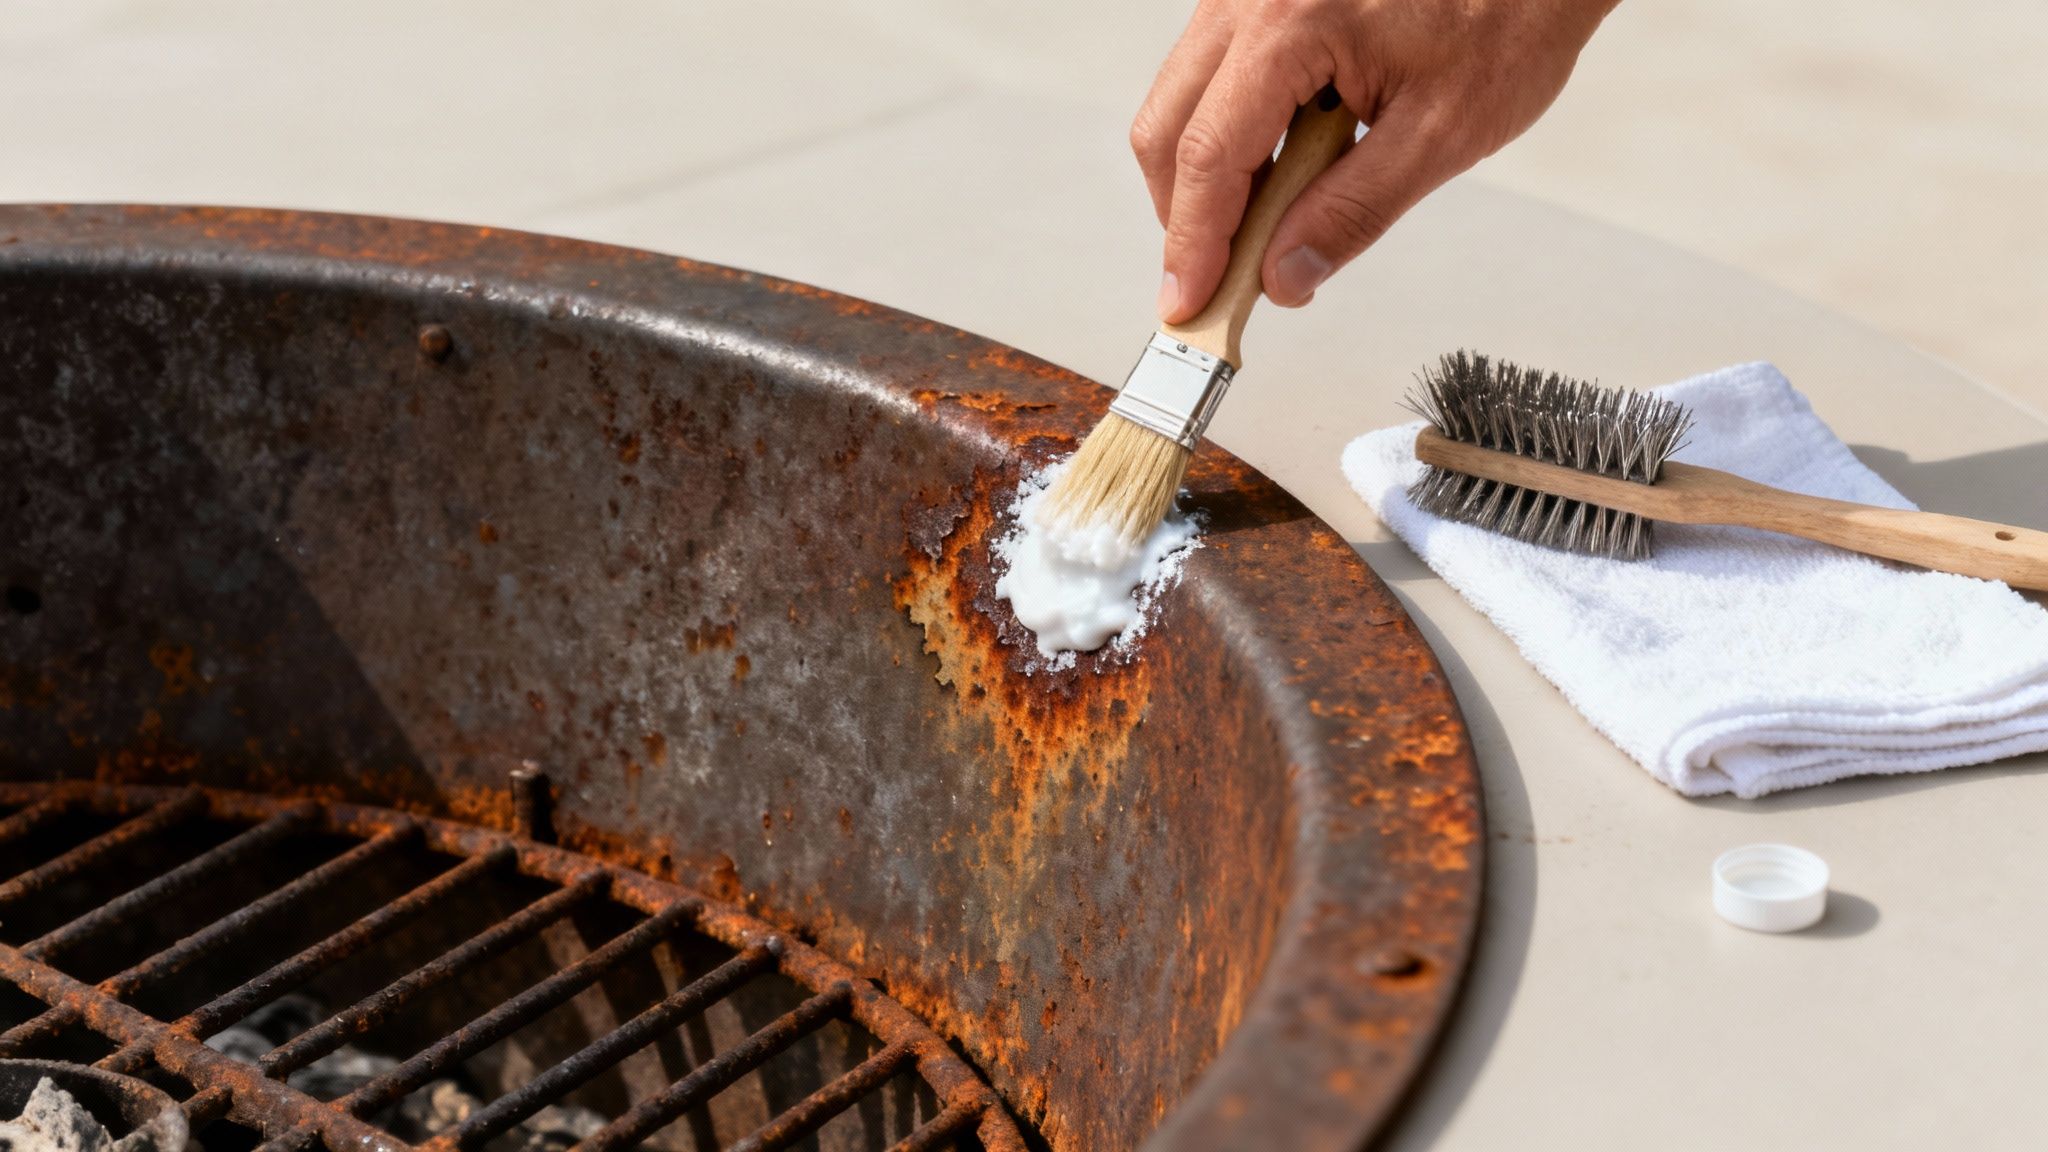
Tackling Rust on Metal Fire Pits
Rust is public enemy number one for any metal fire pit, especially those made from steel or cast iron. The second you spot it, it’s time to get to work.
For light surface rust, a simple DIY paste often does the trick. Just mix equal parts white vinegar and baking soda until you have a thick paste. Slather it right onto the rusted spots and let it sit for about an hour. The vinegar’s mild acid helps dissolve the rust, while the baking soda gives you a gentle abrasive. After it’s had time to work, grab a stiff wire brush or some steel wool and scrub it away.
For the more serious rust that has started to pit the metal, you’ll need to bring out the heavy hitters.
- Scrub It Off: Get a wire brush attachment for your drill or an angle grinder to physically knock off all the loose rust flakes. And please, wear safety goggles and gloves for this part.
- Treat It Chemically: Next, apply a naval jelly or another phosphoric acid-based rust converter. This stuff works by chemically reacting with the remaining rust, turning it into a stable, blackish surface that you can paint over.
- Prime and Paint: Once the surface is clean and totally dry, hit it with a coat of high-heat, rust-inhibiting primer. Finish it off with a high-temperature paint made for grills or fire pits. This creates a tough, protective shield against future moisture.
Pro Tip: After you’ve cleaned and repainted, try seasoning your metal bowl like a cast-iron skillet. Lightly coat the inside with cooking oil and “bake it on” with a small fire. This creates a water-repellent layer that can make a huge difference.
Lifting Soot Stains from Stone and Brick
Soot is especially tricky on porous materials like brick, concrete, or natural stone. The fine black particles get deep into the surface, and just hosing it down won’t cut it.
One of the most effective methods I’ve found is using a poultice. Mix trisodium phosphate (TSP) with water until you get a consistency like peanut butter. Spread a thick layer over the soot stains, cover it with plastic wrap, and tape down the edges to keep it from drying out too fast. Let it sit for a full 24 hours.
As the poultice dries, it literally pulls the soot particles out of the stone’s pores. After a day, peel off the plastic, gently scrape away the dried mix, and give the area a good scrub with a stiff nylon brush (never use wire brushes on stone). A final, thorough rinse should reveal a much cleaner surface.
Stain Removal Cheatsheet by Material
Because different materials need different kinds of love, here’s a quick-reference table for getting rid of the most common stains you’ll encounter.
| Material Type | Best Method for Rust | Best Method for Soot Stains | Important Precaution |
|---|---|---|---|
| Steel / Cast Iron | Wire brush followed by rust converter and high-heat paint. | Scrub with a wire brush and soapy water. | Always allow the paint to fully cure before lighting a fire. |
| Stone / Brick | Not applicable (these materials don’t rust). | TSP poultice or a pressure washer on a low setting. | Test cleaners on a small, hidden spot first to check for discoloration. |
| Concrete / Pavers | Use a commercial rust remover designed for concrete. | A paste of baking soda and water, or a specialized concrete cleaner. | Avoid harsh acids like muriatic acid, which can etch and damage the surface. |
| Copper | A paste of lemon juice and salt, scrubbed gently. | Mild dish soap and a soft cloth. | Copper develops a natural patina; only clean if you prefer the shiny look. |
With the right approach and a bit of elbow grease, you can tackle even the meanest-looking rust and soot, making your fire pit the beautiful centerpiece it was meant to be.
Proactive Care for Year-Round Enjoyment
Knowing how to clean a fire pit after a good bonfire is one thing, but making it last is another. True, long-term care is all about what you do between burns. This is where you play defense against the elements—rain, snow, and humidity—to keep your investment safe and ready for the next get-together.
The simplest, most effective strategy? A high-quality, weather-resistant cover. Think of it as a shield. When moisture gets in and mixes with leftover ash or just sits on bare metal, it creates a corrosive sludge that fast-tracks rust and decay. A snug-fitting cover keeps rain and morning dew out, stopping that whole nasty process before it even starts.
Prepping Your Fire Pit for Winter
As the seasons turn and the air gets that familiar chill, putting your fire pit into hibernation the right way is the key to a hassle-free spring. This goes way beyond just tossing a cover over it. We’re talking about a deep clean and a protective shutdown to prevent winter from doing its worst.
Your winterizing checklist should be thorough:
- Perform a Final Deep Clean: This is your last chance before the freeze sets in. Get every last bit of ash and soot out. A wire brush on the interior can help, then wipe everything down. For gas pits, make sure the burner ports are clear and that any lava rocks or glass are bone dry.
- Inspect for Vulnerabilities: Give it a once-over. Look for any cracks in the structure, loose fittings, or spots where paint has chipped away and exposed bare metal. Now is the time to touch these up with a high-heat sealant or paint to stop them from becoming bigger problems over the winter.
- Protect Gas Components: If you have a propane model, disconnect the tank. Store it upright in a safe, sheltered spot away from your house. For natural gas lines, double-check that the shutoff valve is fully closed. I even recommend capping the line to keep moisture and critters out.
- Secure and Cover: Once it’s clean, dry, and inspected, pull your fire-rated cover over the unit. Make sure it’s fastened securely enough to handle harsh winter winds. If your pit is portable, the best protection is moving it into a shed or garage.
This seasonal shutdown is just one part of getting your yard ready. For a complete guide, our article on how to prepare your garden for winter offers a great roadmap for protecting all your outdoor investments.
Your Spring Reawakening Checklist
When the weather finally breaks and you’re itching for that first fire of the season, a quick inspection is non-negotiable. Winter can be tough on outdoor gear, and you need to spot any issues that might have popped up.
Before you even think about lighting that first fire, take 15 minutes for a safety check. Look for signs of animal nesting in burner tubes, check for new cracks from freeze-thaw cycles, and make sure all gas connections are tight. This simple habit prevents dangerous flare-ups and performance headaches later.
Start by taking off the cover and giving the fire pit a good visual inspection. Clear out any leaves, twigs, or other debris that found its way inside. Critters, especially mice and spiders, love to build nests in protected spots like burner assemblies, so carefully check for any blockages that could cause a problem.
For gas fire pits, reconnect your propane tank and do a quick leak test. Just apply a bit of soapy water to the connections—if you see bubbles forming, you’ve got a leak that needs to be fixed immediately. Finally, test the igniter and make sure you’re getting a strong, even flame. A little prep work in the spring guarantees a season full of safe and memorable nights by the fire.
Got Questions About Fire Pit Cleaning? We’ve Got Answers.
Even with the best guides, real-world questions always pop up. You’re not alone in wondering about the little details—in fact, most homeowners have the same concerns. Let’s tackle the most common questions about keeping your fire pit clean, safe, and looking sharp for years to come.
How Often Should I Actually Clean My Fire Pit?
This is the big one, and the honest answer is: it depends. Your fire pit’s type and how often you’re lighting it up are the main factors. But one rule of thumb always applies—a little bit of regular cleaning saves you from a massive headache later.
For wood-burning fire pits, get in the habit of scooping out the cooled ash after every single fire. It’s a game-changer. Why? Because leftover ash is like a sponge for moisture, creating a gross, corrosive sludge that is the #1 cause of rust on steel and cast iron pits. A full scrub-down with soap and water is only needed every 3-5 fires, or whenever you see a lot of soot building up.
For gas fire pits, the routine is much more laid-back. A quick scan for leaves or twigs before you light it is always a good idea. The deep clean—wiping down the outside, checking the burner ports, and giving the lava rocks or fire glass a rinse—is usually just a twice-a-year job. I like to do it once in the spring to kick off the season and again in the fall before putting it to bed for the winter.
Can I Just Use Windex or Oven Cleaner on It?
It’s tempting to reach for a heavy-duty cleaner from under the sink, but please don’t. This is almost always a bad move. Most household cleaning products are packed with harsh chemicals that can strip your fire pit’s finish or leave a nasty, potentially dangerous residue.
Here’s a quick rundown of what to keep far, far away from your fire pit:
- Oven Cleaners: These are incredibly caustic. They will strip the paint and any protective coating right off, leaving your fire pit completely exposed to rust.
- Abrasive Powders: Think Comet or Ajax. These will scratch and dull the finish on metal, stone, and even copper. You can’t un-scratch it.
- Bleach-Based Products: Bleach is notorious for causing discoloration, especially on natural stone or pavers. It can also speed up corrosion on some metals.
Your best bet is to stick with the simple stuff. Mild dish soap and warm water will handle most of the grime. For tougher spots, a paste made from baking soda and water or a little white vinegar are much safer alternatives that work surprisingly well.
According to the National Fire Protection Association (NFPA), you should never burn things like plastics or treated lumber. The same logic applies to cleaning. Avoid any chemical that could release toxic fumes when you heat it up.
What’s the Right Way to Get Rid of Ashes?
Handling ash disposal correctly is a safety step that people often rush, and it’s a critical one. Ashes that feel cool to the touch can still hide hot embers just waiting to start a fire in your trash can.
The safest way is a simple three-step process:
- Scoop into Metal. Grab a metal shovel and transfer the completely cooled ashes into a metal bucket or can that has a tight-fitting lid. Never, ever use a plastic bucket.
- Add Some Water. Gently pour a little water over the ashes in the bucket. This is your insurance policy to make sure any hidden embers are truly out for good.
- Store It Safely. Put the sealed metal can on a non-flammable surface like a concrete patio or dirt patch, well away from your house, deck, or anything else that could catch fire. Let it sit for a few days before you dump it in with your regular household trash.
As a side note, some gardeners like to use wood ash to add potassium to their soil. If you do this, only use ash from clean, untreated wood, and keep it away from acid-loving plants like blueberries or azaleas.
Do I Really Need to Cover My Fire Pit?
Yes! Leaving your fire pit exposed to the elements is the fastest way to kill it. Rain, snow, and even heavy morning dew are the main ingredients for rust and corrosion.
A good, weather-resistant cover is the single best investment you can make for your fire pit. It keeps moisture out, stops leaves and debris from turning into a soggy mess inside, and even protects the finish from fading in the sun. If your pit didn’t come with one, buying one is a no-brainer. This isn’t just for metal pits, either—even stone or concrete models benefit from a cover that keeps the inside clean and dry, so it’s ready to go for your next fire with zero fuss.
Help! My Gas Fire Pit Won’t Light After I Cleaned It.
Don’t panic. This happens all the time, and the fix is usually pretty simple. Before you start thinking you need a repair person, run through this quick troubleshooting checklist.
- Is the Media Totally Dry? Lava rocks and fire glass absolutely must be 100% dry before you try to light the pit. Any moisture can block the gas flow. Worse, wet lava rocks can crack or pop like popcorn when heated suddenly.
- Are the Burner Ports Clear? Take another look to make sure no tiny bits of debris or water droplets are clogging the gas ports on the burner. A can of compressed air works great for blowing them out.
- Is the Igniter in the Right Spot? Check that the little metal prong (the igniter electrode) is clean, dry, and not physically touching the burner. It needs a small gap to create a spark.
- Are All the Connections Tight? It sounds obvious, but make sure your propane tank or gas line is securely connected and all the valves are turned all the way on.
Nine times out of ten, one of these little things is the culprit. A quick check will get you back to enjoying that clean, beautiful fire pit in no time.
At Reva Housing, we believe that a well-maintained home is a happy home. We provide in-depth, practical guides to help you choose and care for the best products for your kitchen, garden, and living spaces. For more expert reviews and home care tips, explore our guides at Reva Housing.