


When you notice that tell-tale gurgle and the water starts to creep up instead of flowing down, your first thought might be to panic. Don’t. A slow-draining sink is just a heads-up that a bigger clog might be on the horizon. But before you grab the heavy-duty chemicals or start searching for a plumber’s number, there are a few simple, tried-and-true methods you can use with stuff you probably already have under your sink.
These first moves are all about tackling the most common culprits—grease, soap scum, and little bits of food—without resorting to anything that could harm your pipes. Think of this as plumbing first aid: quick, easy, and surprisingly effective.
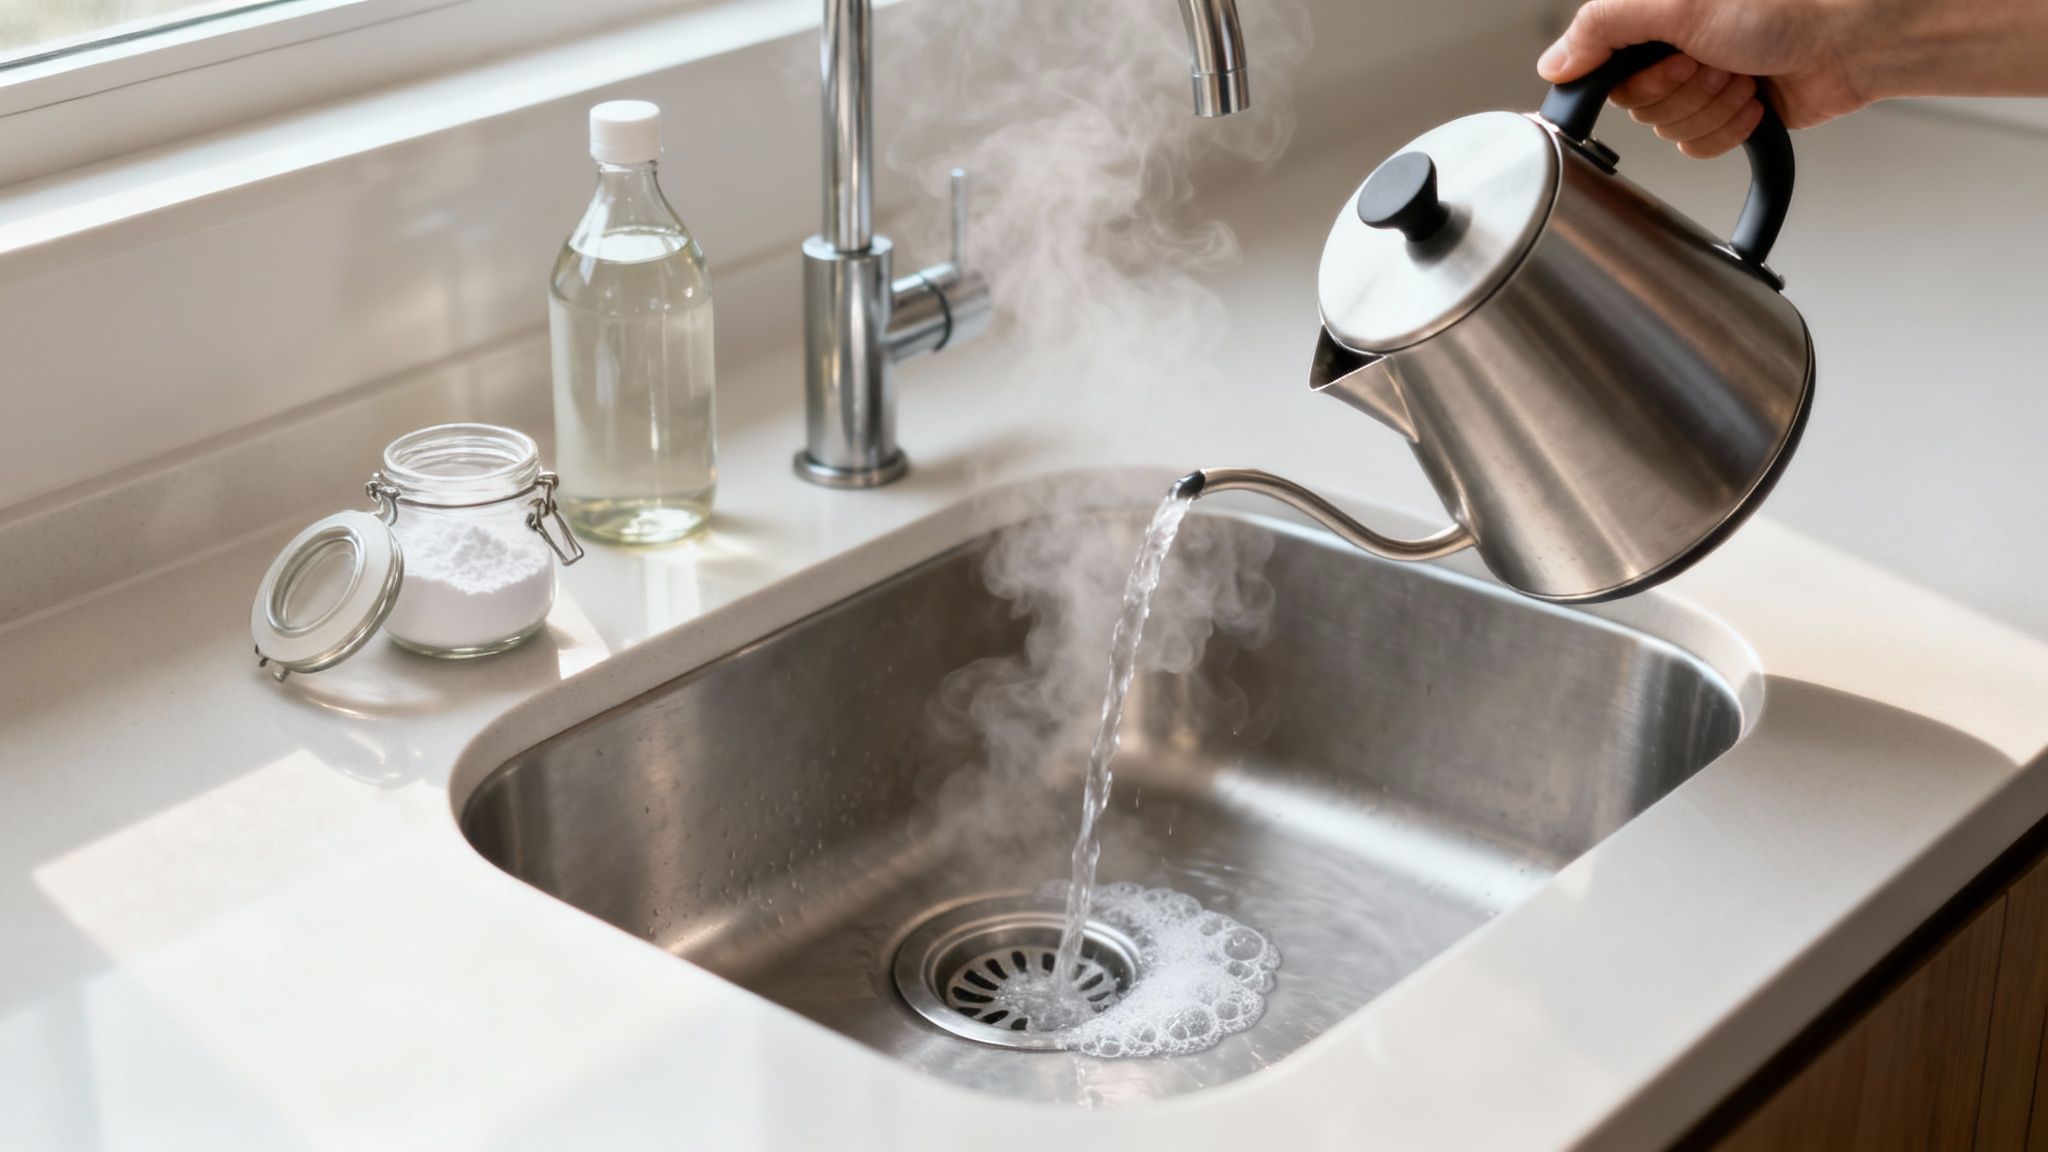
The Boiling Water Flush
Honestly, one of the easiest and most effective things you can do is just pour a kettle of boiling water straight down the drain. The intense heat is fantastic at melting away the greasy, gunky buildup that often causes kitchen sink clogs in the first place.
Boil a full kettle and carefully pour it down the drain in a few separate bursts. Give it a few seconds between each pour to let the hot water do its work and start breaking things down.
Pro Tip: This is a go-to trick for metal pipes. If you have PVC pipes, however, be a little more cautious. Super-hot water can sometimes soften the plastic joints. It’s better to let the water cool down just a bit from a rolling boil before you pour it.
The Classic Baking Soda and Vinegar Trick
If boiling water alone doesn’t cut it, it’s time for the old science fair volcano trick. The combination of baking soda and vinegar creates a fizzing, bubbling reaction that can physically break up and dislodge whatever is causing the blockage. It’s a fantastic, all-natural alternative to harsh chemical cleaners.
Here’s how to do it right:
- First, dump about half a cup of baking soda directly into the drain. Try to get as much as you can down the pipe.
- Next, pour in an equal amount of plain white vinegar. You’ll hear it start fizzing immediately.
- Quickly, plug the drain with a stopper or a cloth. This traps the reaction and forces all that bubbling action down into the clog where it needs to be.
- Now, just let it sit. Give it at least 15-30 minutes to work its magic. For a really stubborn clog, an hour won’t hurt.
- Finally, flush everything out with another pot of boiling water (or very hot tap water).
This little combo is a powerhouse for bathroom clogs caused by toothpaste and soap scum and works just as well on kitchen backups. As a bonus, it’s great for getting rid of any funky drain odors. While you’re at it, making sure the rest of your sink shines is important, too—check out our guide on how to clean stainless steel for tips.
Using Salt and Hot Water
No vinegar on hand? No problem. Coarse salt is another great option. It acts as a gentle abrasive, helping to scour the gunk from the inside of your pipes, especially when you follow it up with hot water to dissolve any grease.
Just pour about half a cup of coarse salt (kosher or sea salt works best) down the drain, then chase it with a kettle of boiling water. Let it sit for a few minutes, then flush it all away with hot tap water. This is also a fantastic preventative trick to do once a month to keep things flowing smoothly.
Before moving on to more serious tools, it helps to have a quick reference for these initial, gentler methods. Here’s a simple breakdown of what to try first when you notice your drain is slowing down.
Quick Fixes for a Slow Sink Drain
| Method | Best For | Supplies Needed | Time Required |
|---|---|---|---|
| Boiling Water Flush | Minor grease, soap scum, and food particle buildup | Kettle or pot of boiling water | 5-10 minutes |
| Baking Soda & Vinegar | Moderate clogs, food residue, and drain odors | Baking soda, white vinegar, hot water | 20-30 minutes |
| Salt & Hot Water | Scouring pipes and dissolving light grease | Coarse salt and boiling water | 10-15 minutes |
These simple fixes can often resolve the issue without you needing to break out a single tool. If you’ve tried them and the clog is still hanging around, don’t worry—it’s time to move on to some more hands-on approaches.
Using Plungers and Drain Snakes Like a Pro
Alright, so you’ve tried the simple stuff and that stubborn clog is still holding on for dear life. It’s time to roll up your sleeves and bring out the hardware. Don’t be intimidated; learning to properly use a plunger or a drain snake is a core DIY skill that can save you a ton of cash and frustration down the line. Once you get the hang of these tools, you’ll be ready to tackle some pretty serious blockages on your own.
First things first, you need the right plunger for the job. A lot of people don’t realize there’s a difference, but it matters. A sink plunger, sometimes called a cup plunger, is flat on the bottom. It’s designed to create a tight seal over a flat surface like a sink or tub drain. A toilet plunger, on the other hand, has a flange meant for the curve of a toilet bowl. Using the right one is absolutely essential for getting any real results.
Mastering the Plunger Technique
To really get that clog moving, you need to use the plunger correctly. Start by adding a few inches of water to the sink—just enough to completely cover the rubber cup of the plunger. This is the key. Plunging a dry sink is just pushing air around; the water is what creates the hydraulic pressure you need to actually dislodge anything.
Now, place the plunger directly over the drain opening, making sure you have a solid seal all the way around. If you’re working with a double-basin kitchen sink, grab a wet rag and stuff it into the other drain. This blocks off the escape route for air and water, forcing all the pressure down toward the clog.
Time to get to work. Start plunging with firm, vertical thrusts. It’s not about brute strength, but a steady, consistent rhythm. Push down firmly, then pull up sharply. Do this for about six to eight repetitions. You’re using the water to create a back-and-forth of pressure and suction, which is what will hopefully break that clog loose. After a set of plunges, lift the plunger and see if the water starts to drain. You might have to repeat the process a few times.
When to Grab a Drain Snake
If the plunger just isn’t cutting it, the clog is probably either deep down the pipe or made of something more solid, like a dense hairball or even a small object that fell in. This is where the drain snake—also known as a drain auger—comes in handy. It’s essentially a long, flexible steel cable that you feed into the pipe to physically break up or pull out the blockage.
Before you start, you’ll likely need to remove the drain stopper. Feed the end of the snake into the drain opening, and as you push it deeper, turn the handle clockwise. You’ll feel some resistance when you hit a bend in the pipe (like the P-trap) and again when you hit the clog itself.
Key Takeaway: When you feel the snake hit the clog, don’t just try to force it through. Instead, rotate the handle while gently pushing and pulling. This lets the corkscrew tip of the auger either break the blockage into smaller pieces that can be flushed away or hook onto it so you can pull the whole mess back out.
Once you think the drain is clear, carefully retract the snake. Then, run hot water down the drain for a few minutes to flush out any leftover debris.
Investing in quality tools like these is becoming more common as homeowners take on more maintenance themselves. The drain cleaning equipment market is actually projected to grow from USD 288.3 million in 2025 to USD 516.2 million by 2035—a clear sign that people are embracing DIY solutions. You can learn more about this trend from Future Market Insights.
Tackling the P-Trap: The Real Source of Most Clogs
If plunging and snaking didn’t do the trick, it’s time to get a little more hands-on and look under the sink. See that U-shaped bend in the pipe? That’s called a P-trap, and its main job is to hold a little bit of water to keep nasty sewer gases from creeping into your home.
But that helpful curve has a downside—it’s also the perfect spot for everything you wash down the drain to get stuck.
Think of it as your drain’s personal junk drawer. Over time, hair, grease, soap scum, and tiny bits of food build up in that bend, eventually forming a solid, stubborn blockage. Cleaning it out directly is often the surefire way to fix a clog when nothing else works.
The good news? This isn’t nearly as intimidating as it sounds. With a few basic tools and about 30 minutes, you can have that P-trap sparkling clean and your sink draining like it’s brand new. It’s a game-changing DIY skill that saves you a call to the plumber.
Gathering Your Tools and Prepping the Area
Before you start twisting any pipes, a little bit of prep work will save you from a huge mess later. The first thing you need to do is clear everything out from under the sink. Give yourself as much room to work as possible.
Next, round up your supplies. You don’t need a pro’s toolkit for this job, just a few essentials:
- A Bucket or Basin: You’ll want to place this right under the P-trap to catch all the water and gunk that’s about to come out.
- Channel-Lock Pliers (or a Pipe Wrench): These are essential for getting a good grip on the slip nuts that hold the trap together.
- A Stiff Brush or Bottle Brush: An old toothbrush works in a pinch, but a dedicated pipe brush is perfect for scrubbing the inside of the trap.
- Rubber Gloves and Old Towels: Trust me, this can be a messy job. Protect your hands and have towels on standby for inevitable spills.
Once you’ve got your station set up, you’re ready to get to it.
Removing and Cleaning the P-Trap
With your bucket perfectly positioned, take a look at the two large slip nuts connecting the U-shaped part of the pipe. One connects to the vertical pipe dropping down from the sink drain (that’s the tailpiece), and the other connects to the horizontal pipe heading into the wall.
Grab your channel-lock pliers, get a firm grip on the first slip nut, and turn it counter-clockwise to loosen it. It might be on there pretty tight, but some slow, steady pressure should break it free. Once it’s loose, you can usually finish unscrewing it by hand. Now, do the same for the second nut. As you loosen this last one, get ready—this is when water and sludge will start pouring into your bucket.
Carefully pull the P-trap down and away from the other pipes. Take it over to another sink (or even outside with a hose) and dump out whatever’s left inside. Use your brush with some hot, soapy water to give the inside a really good scrub. You might be shocked at what you find in there. After it’s clean, give it a final rinse and head back to the sink for reassembly. This one simple task gets to the root cause of so many nagging clogs.
Before you resort to cleaning the P-trap, a plunger is always a great first step. This infographic breaks down the process.
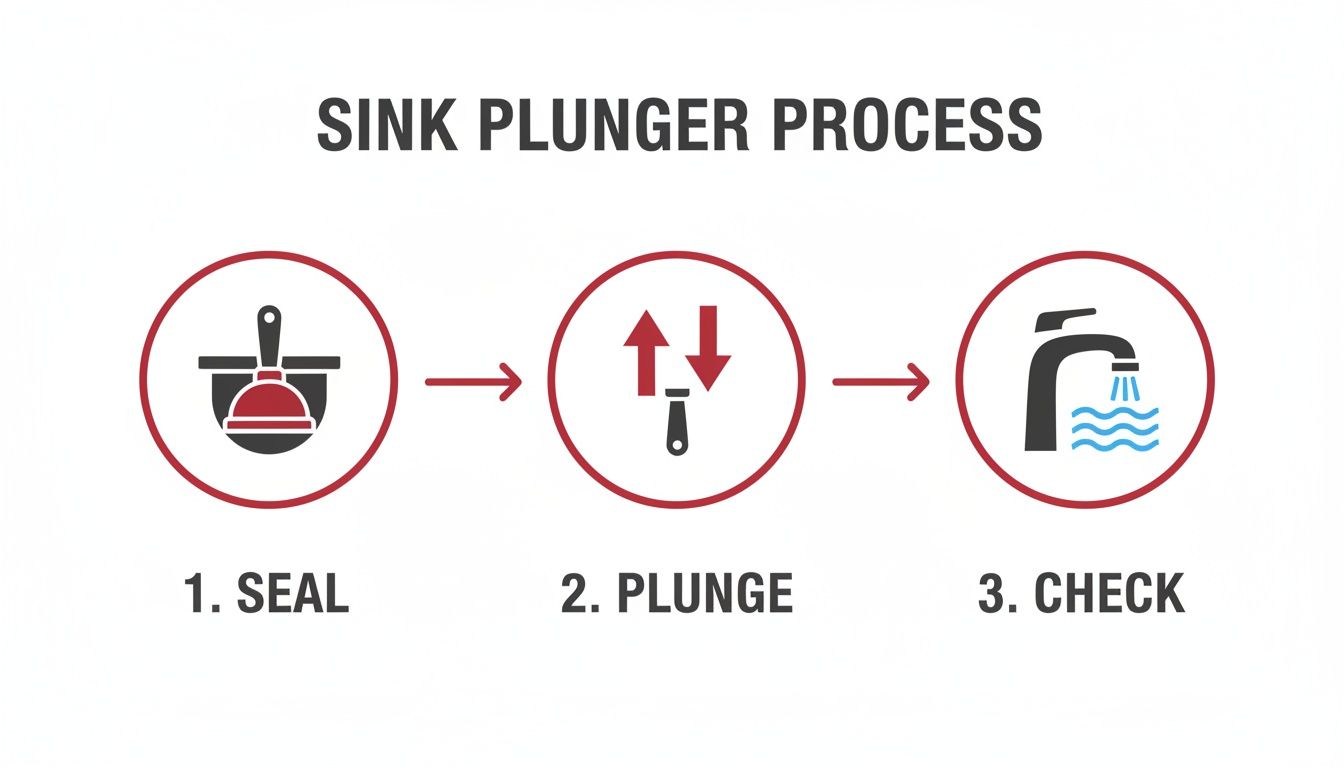
As the visual shows, success with a plunger is all about getting a proper seal and using a consistent motion before checking your work.
Reinstalling and Checking for Leaks
Putting the P-trap back is just the reverse of taking it off. Slide the slip nuts back onto the straight pipes, line up your clean trap, and hand-tighten the nuts. Make sure the little plastic washers, or gaskets, are seated properly to create a watertight seal.
Once they’re hand-tight, give each nut a gentle quarter-turn with your pliers to snug it up. Be careful not to over-tighten, as you can easily crack the plastic fittings and create a whole new problem.
Crucial Final Step: After everything is back together, turn on the hot water and let it run for a minute or two. Keep a close eye on the P-trap connections and feel around them for any drips. If you spot a leak, a tiny extra turn on the closest nut should take care of it.
Industry data confirms just how common this issue is, with an estimated 70% of clogs caused by grease and hair that collect right here in the P-trap. A little proactive cleaning can save you major headaches and money down the line. You can learn more about the massive $5 billion sink drain market and its trends with these insights from Archive Market Research.
Choosing the Right Drain Cleaner Without Wrecking Your Pipes
Walking down the cleaning aisle feels like a pop quiz, doesn’t it? Dozens of brightly colored bottles all promise to magically fix your clogged sink. But before you just grab the one with the flashiest label, it’s worth knowing what you’re actually about to pour down your pipes.
The choice you make here isn’t just about the clog. It’s about the long-term health of your plumbing. The two main players in this game are chemical cleaners and enzymatic cleaners, and they couldn’t be more different in how they get the job done.
Chemical vs. Enzymatic Cleaners: The Showdown
Chemical drain cleaners are the heavy hitters. They’re the ones that use powerful, caustic ingredients to create a chemical reaction that literally dissolves whatever’s in their way. They work incredibly fast, often melting away hair, grease, and soap scum in just a few minutes. Brutally effective.
But all that power comes with some serious strings attached. These chemicals are tough on your plumbing, especially if you have older metal pipes or even PVC. Over time, they can cause corrosion or weaken the joints. They’re also no joke if they splash on your skin or if you inhale the fumes, and they’re pretty harsh on the environment.
Here’s a pro tip I can’t stress enough: Never, ever use a chemical cleaner on a drain that’s completely blocked. If the water isn’t moving at all, that corrosive liquid is just going to sit there, right on top of the clog, eating away at your pipes. That’s a recipe for a much bigger, more expensive problem.
Enzymatic cleaners, on the other hand, are the slow-and-steady-wins-the-race option. Instead of harsh chemicals, these use a mix of natural bacteria and enzymes that basically “eat” all the organic gunk—the grease, hair, and food bits. It’s a much slower process, sometimes taking several hours or even overnight, but it’s infinitely safer for your pipes, septic system, and the planet.
Honestly, they’re the best choice for routine maintenance or for tackling those annoying slow drains before they turn into a full-blown stoppage.
It seems more and more homeowners are catching on. The global market for sink and drain unblockers hit a massive USD 3.5 billion in 2023 and is expected to climb to USD 5.8 billion by 2032. People are getting more proactive about home hygiene, which is great to see. You can dig into more of the numbers behind this trend in this Dataintelo industry report.
Making the Right Call
So, how do you decide which bottle to grab? It really comes down to what you’re dealing with.
Here’s a quick cheat sheet based on real-world situations:
- For a slow-moving drain: Go with an enzymatic cleaner every time. It’s your best first move. Using one monthly is also a great way to keep clogs from ever forming in the first place.
- For a stubborn, partially blocked drain: A chemical cleaner might be what you need, but use it as a last resort. Follow the safety instructions to the letter and use it sparingly.
- If you have old pipes or a septic system: Stick with enzymatic cleaners. Always. It’s just not worth the risk of causing expensive damage to your plumbing or disrupting your septic tank’s ecosystem.
At the end of the day, just knowing the difference between these two types of cleaners puts you in a much better position. You can solve your immediate problem without accidentally creating a new one down the road.
Keeping Your Drains Clear with Smart Habits
The best way to fix a clogged sink? Never let it get clogged in the first place. I know, it sounds a little too simple, but adopting a few smart habits can save you a world of future headaches, gross messes, and calls to the plumber. Think of it as preventative maintenance for your home’s plumbing system.
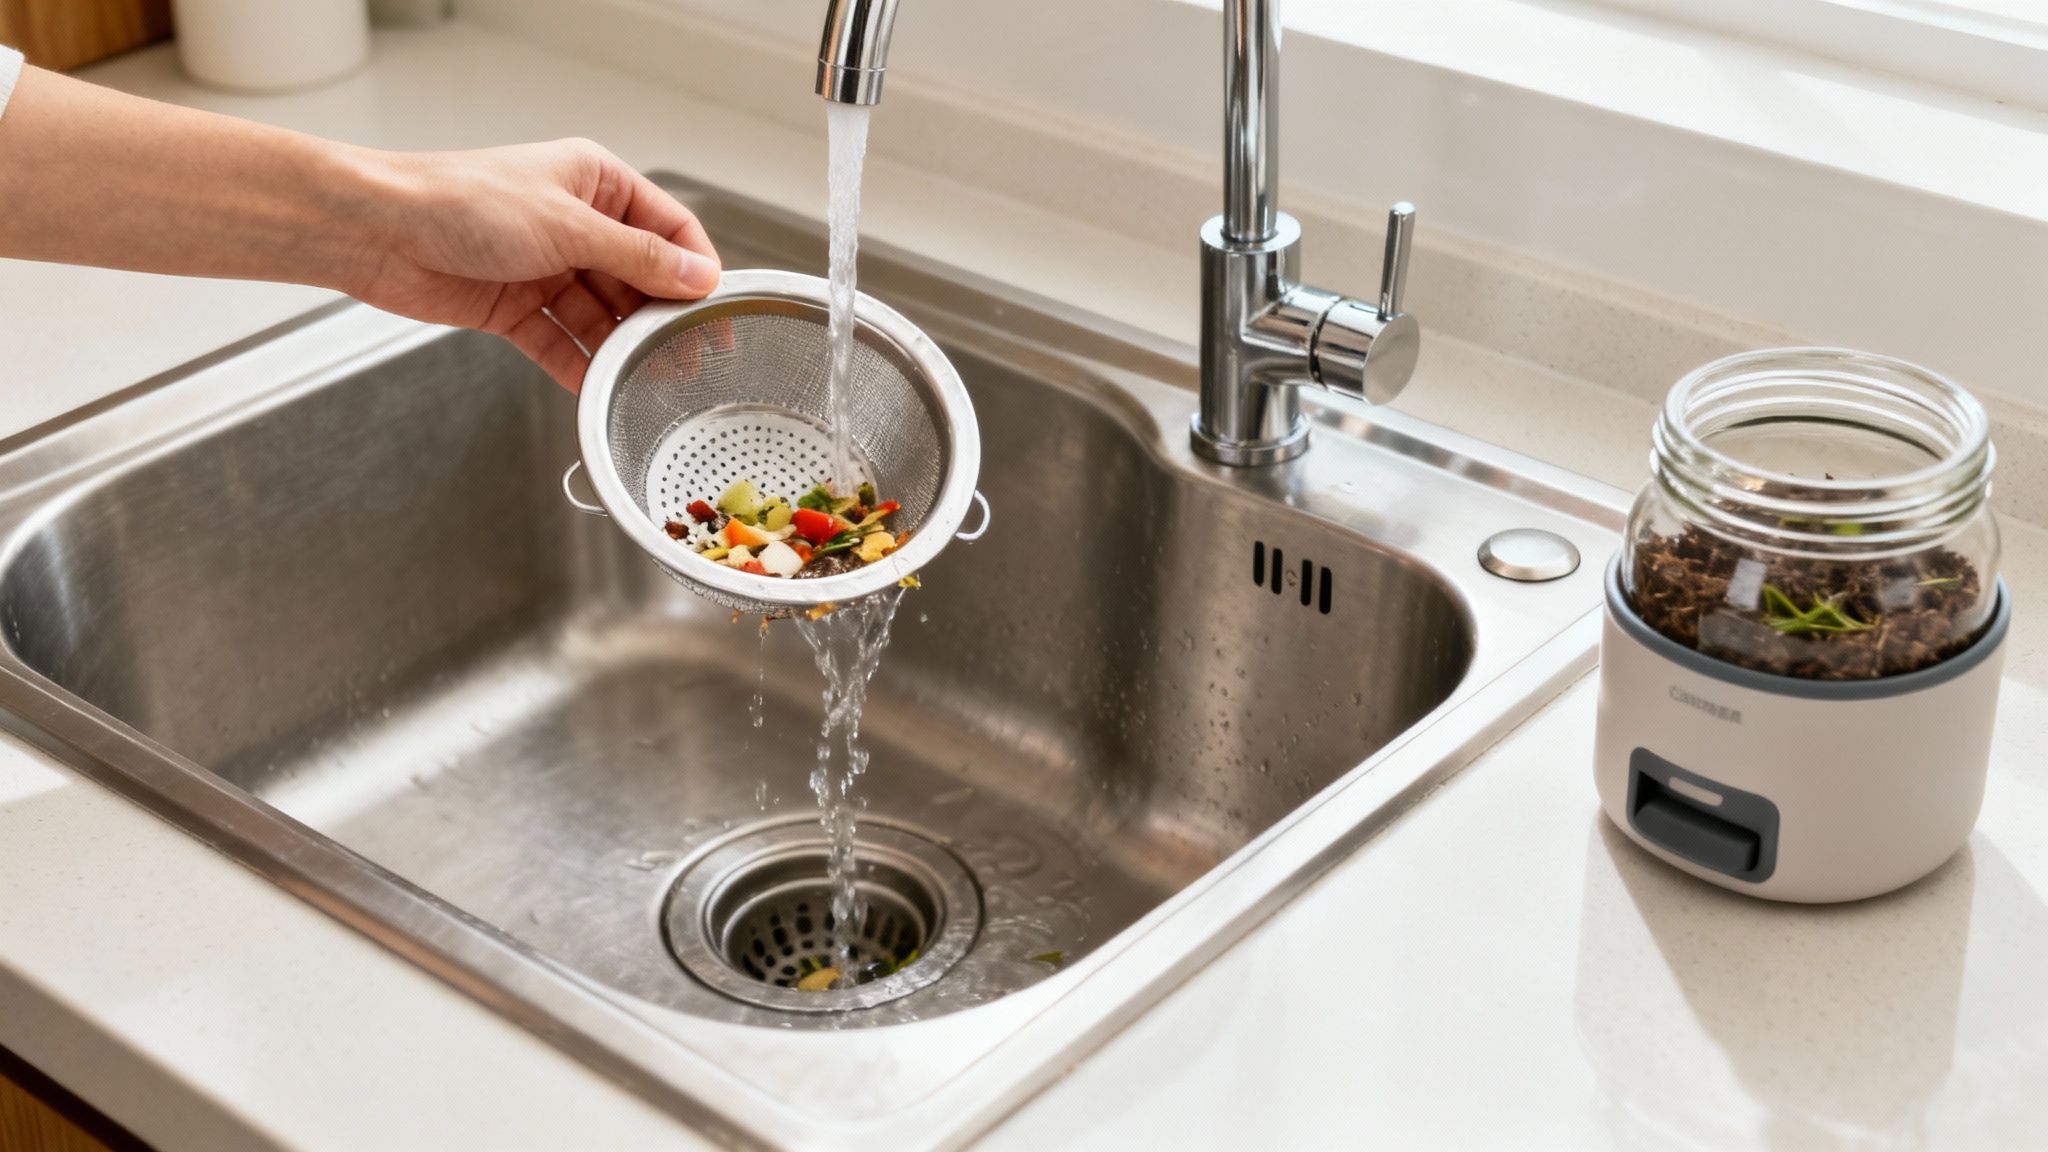
Your first line of defense is a simple sink strainer. Seriously, this little gadget is your plumbing’s best friend. It catches all the food scraps, hair, and other bits of gunk before they can wash down the drain and start causing trouble. The trick is to actually empty it—ideally after every meal prep—into your compost bin or the trash.
What to Never Put Down Your Kitchen Sink
Even if you have a top-of-the-line garbage disposal, it’s not a black hole. Certain things are notorious for creating stubborn, greasy blockages that no amount of grinding will fix. Treating your disposal with a little respect is the key to keeping it running smoothly for years.
Here are the absolute worst offenders to keep out of your sink:
- Grease, Fats, and Oils: This is public enemy number one for your pipes. They might pour down easily when hot, but as soon as they cool, they solidify into a sticky, pipe-clogging wax that traps everything else that comes along.
- Coffee Grounds: They seem harmless, but coffee grounds clump together in water and form a dense, sludge-like mess inside your pipes.
- Fibrous Vegetables: Think celery stalks, corn husks, and artichoke leaves. Their stringy fibers can wrap around the disposal’s blades, creating a tangled knot that brings everything to a halt.
- Eggshells: It’s an old myth that they sharpen the blades. In reality, the thin membrane inside the shell can stick to the pipe walls and contribute to clogs.
- Expandable Foods: Pasta, rice, and even bread swell up when they absorb water. Down in your drain, they can expand into a thick, paste-like substance that’s incredibly effective at blocking flow.
A game-changing habit is to scrape every last bit of food from plates into the trash before rinsing them. This one simple action drastically cuts down on the gunk entering your plumbing and prevents the most common types of clogs from ever forming.
Simple Monthly Maintenance
A little bit of monthly TLC can keep your drains flowing freely and prevent buildup before it becomes a problem. Once a month, just pour that classic mixture of baking soda and vinegar down each drain, let it fizz, and follow it up with a kettle of very hot water. It works wonders on dissolving any accumulating soap scum and grease.
It’s all about consistent care. Just like finding the best vacuum for pet hair helps you stay on top of allergens before they build up, a little monthly drain maintenance prevents much bigger plumbing issues down the road.
When to Put Down the Tools and Call a Plumber
Knowing when to step back is the mark of a smart DIYer. While there’s a huge sense of satisfaction in conquering a slow drain on your own, some plumbing problems are bigger than they seem on the surface.
If you push a DIY fix too far, you can easily turn a simple clog into a costly plumbing disaster. Recognizing the red flags is the key to protecting your home—and your wallet.
The most obvious sign it’s time to call for backup is when you’ve flat-out exhausted all your options. If you’ve plunged, snaked the drain, and even cleaned out the P-trap but the sink is still stubbornly blocked, the real problem is deeper in your plumbing system. A professional plumber has powerful tools like motorized augers and high-definition sewer cameras that can find and bust up blockages far beyond a homeowner’s reach.
Interpreting the Warning Signs
Sometimes, the clues that you’re dealing with a bigger issue aren’t about the clog itself, but the weird side effects. Pay close attention to what your drains are telling you, as these symptoms often point to a problem that needs an expert eye.
Persistent foul odors are a major red flag. If you’ve cleared what you thought was the clog but a nasty sewer gas smell hangs in the air, it might signal a problem with your drain’s venting system. It could also mean there’s a buildup of decaying gunk deep within the pipes. This isn’t just gross; it can be a health concern.
A critical indicator of a serious plumbing issue is when multiple fixtures start acting up at once. If your kitchen sink, a toilet, and a shower all begin draining slowly simultaneously, the problem isn’t with an individual drain. This is the classic symptom of a main sewer line clog, which is a job strictly for professionals.
When to Make the Call
Deciding to hire a plumber isn’t admitting defeat—it’s making a strategic move to prevent much worse damage. Here are a few clear-cut scenarios where you should just pick up the phone:
- You’ve tried every DIY method you can think of without any luck.
- Multiple drains are slow throughout your entire home.
- Water is backing up into other fixtures, like into the shower when you run the sink.
- You hear constant gurgling sounds coming from multiple drains.
These signs all point to a systemic issue that your simple tools just can’t fix. Trying to clear a main line clog yourself can lead to sewage backing up into your home, which is a messy, expensive, and hazardous situation nobody wants to deal with.
Technology is certainly making home management easier, and while some people are looking into affordable smart home devices to monitor for leaks, knowing the classic signs of plumbing trouble is still essential.
Ultimately, calling a plumber is about getting the job done safely and correctly. They can diagnose the root cause and get your plumbing working properly again without risking damage to your pipes or property.