


Ever wondered if setting a nice table is a lost art in our fast-paced world? It’s a fair question. But a well-set table is more relevant than ever—and it’s not about memorizing stuffy, outdated rules.
It’s about communicating care and intention. Think about hosting your first big holiday dinner, or even just wanting to make a Tuesday night meal with your family feel special. The simple act of arranging plates and utensils thoughtfully can elevate the entire experience.
A proper table setting does more than just hold the food. It sets the tone, makes guests feel welcomed and respected, and brings a sense of order to the meal. It’s a non-verbal way of saying, “This moment is important, and you are important.”
This guide is designed to demystify the whole process. We’ll walk you through the three core layouts you’ll ever need, giving you the confidence to host with genuine warmth and style.
- The Basic Setting: Perfect for daily meals, this is the foundational layout you’ll use most often.
- The Casual Setting: A step up for relaxed dinner parties or weekend brunches, adding a touch of polish without feeling fussy.
- The Formal Setting: The go-to for holidays and big celebrations, creating an elegant and impressive atmosphere.
By the end of this guide, you won’t just know how to set a table; you’ll understand the logic behind it. This knowledge empowers you to adapt the rules to fit your specific occasion, your dinnerware, and your personal style, turning any meal into a genuine occasion.
The Everyday Basic Place Setting Demystified
Let’s be honest, most of our meals don’t require the full Downton Abbey treatment. Mastering the basic table setting is about bringing a little order and intention to the everyday, whether it’s a quick breakfast before work or a casual weeknight dinner with the family. This is the foundation you’ll use 90% of the time.
The whole point is to make dining easy and comfortable. It’s practical, not pretentious.
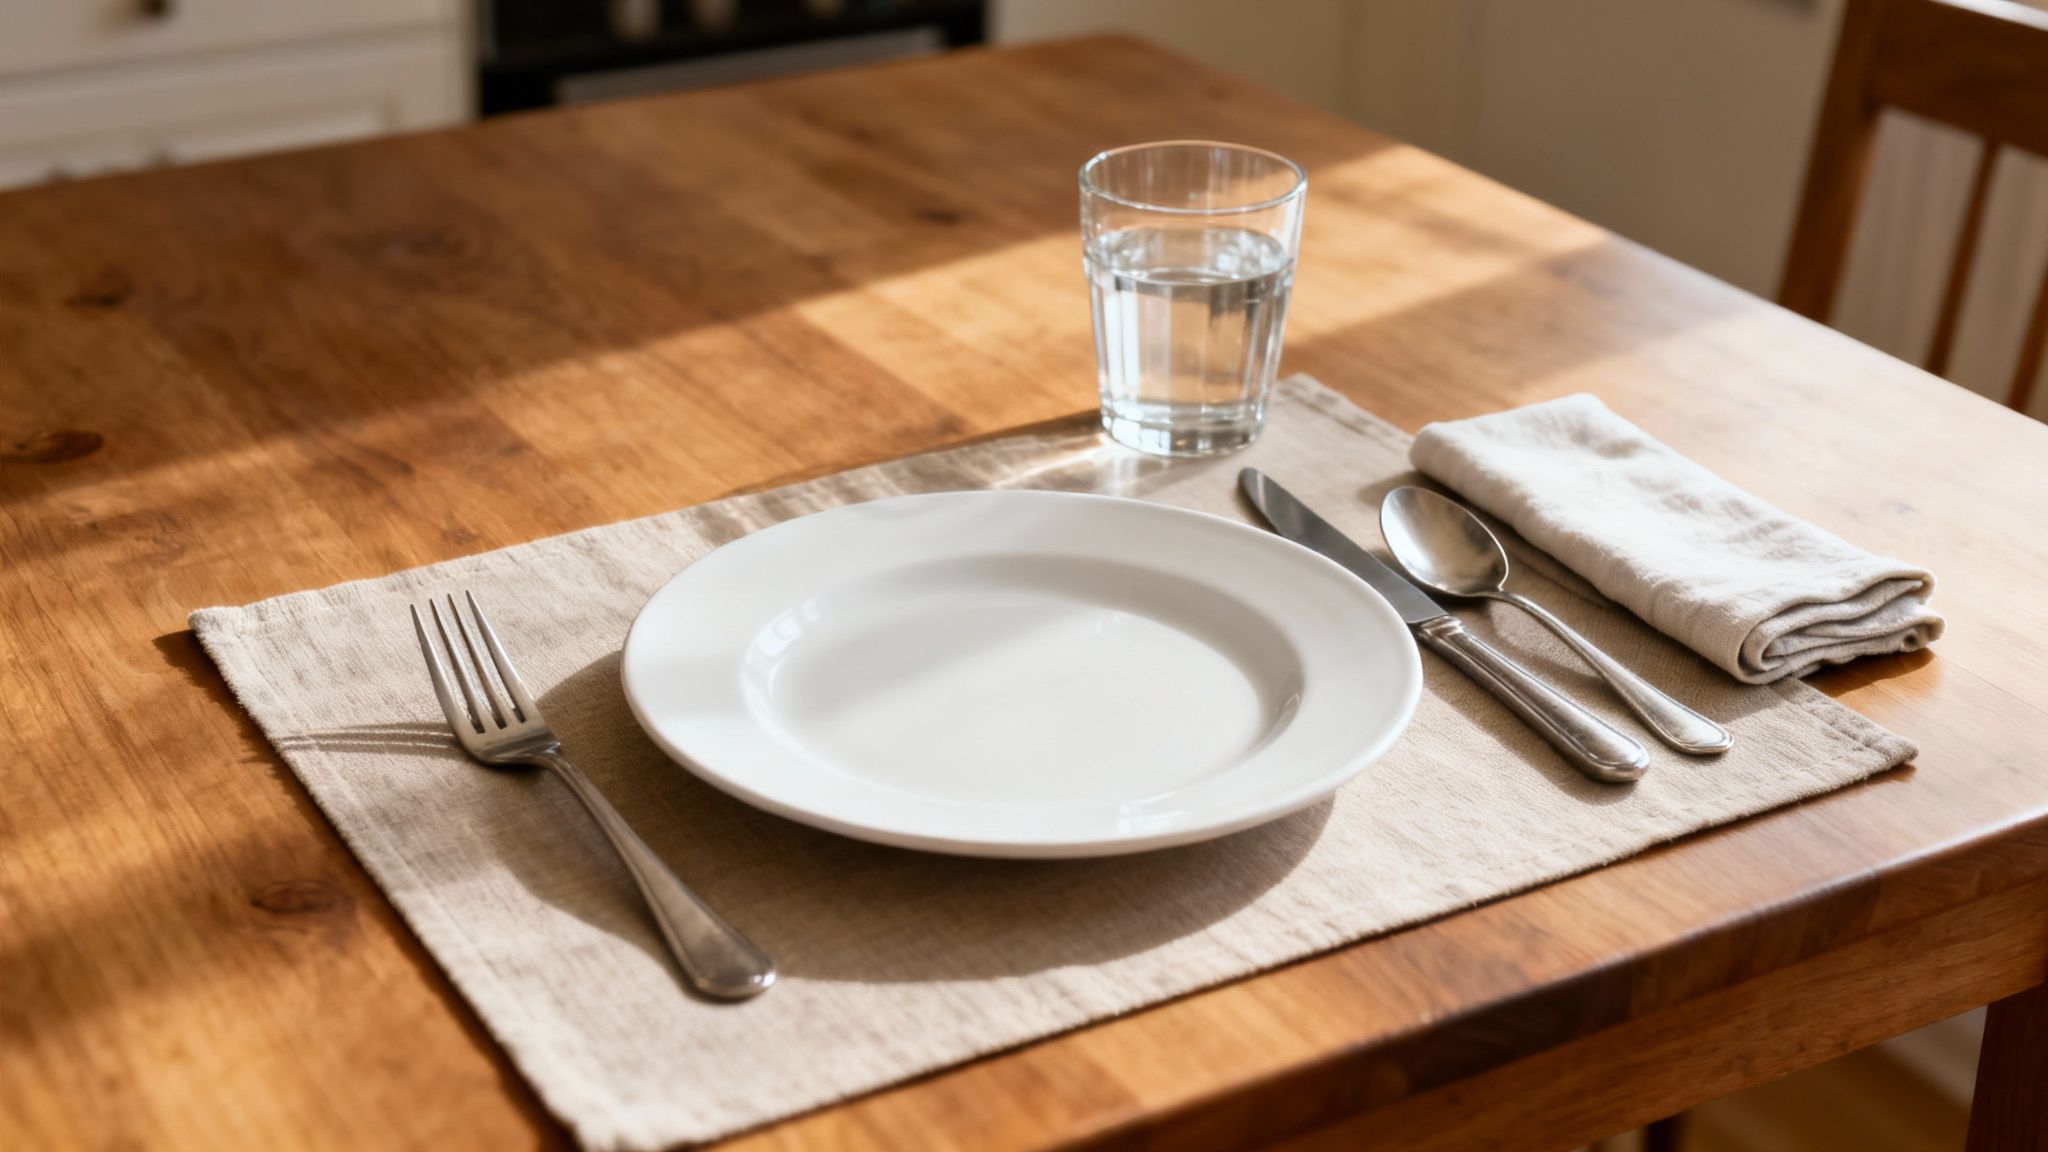
If you’re using a placemat, start by centering it in front of the chair. This creates a neat little zone for each person and adds a layer of protection for your table. The dinner plate then goes right in the middle, acting as the anchor for everything else.
Getting Your Utensils in Order
Now for the silverware. The logic here is simple: you place utensils in the order you’ll use them, from the outside in. For a basic setting, it’s even easier.
- Fork to the left. Just the one dinner fork is all you need here.
- Knife and spoon to the right. The knife goes right next to the plate, with the blade facing inward. Your spoon sits to the right of the knife.
Think of it this way: we eat from the outside in, and we typically use our fork first for the main course. A quick memory trick I’ve always used is that “fork” and “left” both have four letters. “Knife,” “spoon,” and “right” all have five. It’s a silly little thing, but it works every time.
Pro Tip: For a really polished look, line up the bottoms of your utensils with the bottom rim of the plate. Also, leave about one inch between the table’s edge and the handle of your flatware. This small detail prevents utensils from getting bumped onto the floor.
The Finishing Touches
With the main pieces down, you only need a couple more things. The water glass goes at the top right, hovering just above the tip of the knife. This spot keeps it out of the way but still easy to grab.
The napkin is your final move. For a simple meal, you don’t need a fancy fold. Just place it neatly to the left of the fork or, if you want to keep things compact, right on top of the plate. A simple rectangle fold looks clean and is totally appropriate.
Here’s a quick cheat sheet to pull it all together.
Quick Guide to the Basic Place Setting
This table breaks down the essentials for a simple, everyday setup. No frills, just function.
| Item | Placement | Pro Tip |
|---|---|---|
| Placemat | Centered in front of the chair. | Acts as the visual anchor for the setting. |
| Plate | In the center of the placemat. | All other items are arranged around the plate. |
| Fork | To the left of the plate. | “Fork” and “left” both have four letters. |
| Knife | To the right of the plate, closest to it. | Blade must always face the plate. |
| Spoon | To the right of the knife. | For soup, cereal, or dessert served with the meal. |
| Water Glass | Above the tip of the knife. | Keeps it within reach but out of the way. |
| Napkin | To the left of the fork or on the plate. | A simple fold is perfect for everyday meals. |
See? It’s straightforward once you know the logic.
While old-school formal settings could include up to 12 pieces, modern life has definitely streamlined things. Most contemporary cutlery sets sold today are 20–24 piece sets designed for 4-6 people, which tells you that most of us are sticking to the essentials.
Ultimately, setting a basic table is a small ritual that makes a meal feel more thoughtful and organized. Once you get the hang of it, you’ll be able to do it in under a minute. If you’re looking to build out your collection, you might want to check out our guides to other essential kitchenware.
The Casual Setting: For Dinners That Feel Special
Ready to host a dinner party, a special weekend brunch, or any meal that feels a little more important than your average weeknight? This is where the casual place setting really shines. It builds on the basic layout but adds a few key pieces to create a more polished—yet still totally approachable—vibe for your guests.
Think of it as the perfect middle ground. It’s more refined than a Tuesday night taco situation, but not as buttoned-up as a formal holiday feast. The whole point is to make your guests feel special without making the environment feel stiff or stuffy.
Adding Utensils: The “Outside-In” Rule
The biggest jump from a basic to a casual setting is usually the addition of utensils for multiple courses. You might be serving a soup or salad before the main entree, which means your guests are going to need the right tools for the job.
This is where the golden rule of table setting comes into play: work from the outside in. You simply arrange the utensils in the order they’ll be used, with the silverware for the first course sitting on the outermost edges. It’s that easy.
- To the left of the plate: The dinner fork goes closest to the plate. Next to it, on the outside, is the salad fork. Your guest will use the salad fork first, then the dinner fork.
- To the right of the plate: The dinner knife sits right next to the plate (with the blade facing in, always). If you’re serving soup, the soup spoon goes to the right of the knife.
This simple logic takes all the guesswork out of it for both you and your guests. It’s an intuitive system that guides everyone through the meal without a second thought.
Mastering Glassware Placement
Glassware is another area where the casual setting steps things up. Besides a water glass, you’ll probably be offering wine. Placing them correctly keeps the table looking organized and prevents that awkward moment when someone has to reach across their neighbor.
While the tradition has roots in 18th and 19th-century etiquette, today’s hospitality standards usually call for one to three glasses. For a casual dinner, a water glass and one wine glass are perfect.
Here’s how to get it right: place the water glass directly above the tip of your dinner knife. Then, position the wine glass just to the right of the water glass, creating a slight diagonal line. Professional service standards suggest placing the water glass about 1.5–2 cm above the knife, with the wine glass at a 15–30 degree angle to its right. This creates a neat, accessible triangle of glassware. You can see more insights about these professional standards on OpenTable.
Simple, Elegant Napkin Folds
A basic setting is fine with a simple folded napkin, but a casual get-together is your chance to add a little personality. You don’t need to master complex origami, but a few simple folds can make a big impact.
Here are two easy yet elegant options that always work:
- The Pocket Fold: This classic is perfect for tucking in a menu, a place card, or even the silverware itself. It looks clean and keeps everything contained.
- The Ring Fold: This is probably the easiest way to add a sophisticated touch. Just pull the napkin through a decorative ring. Napkin rings come in endless styles, so you can easily match them to your decor or the theme of the dinner.
You can place the folded napkin right on top of the plate as a little centerpiece for the setting, or to the left of the forks. Either placement is correct and looks fantastic.
Hosting Tip: Don’t stress about having perfectly matching sets of everything. A “collected” look, with complementary but not identical glassware or napkin rings, can add a ton of charm and character to a casual table. It feels authentic and lived-in.
Ultimately, the casual setting is all about adding thoughtful layers. By including the right utensils for each course and arranging glassware with care, you’re telling your guests you’ve put thought into their comfort and enjoyment. It’s what creates a warm, welcoming environment that encourages great conversation—and that’s what a good meal is all about.
Mastering the Elegant Formal Place Setting
When you’re pulling out all the stops for a holiday, a big celebration, or any dinner that just feels special, the formal place setting is your game plan. It’s what turns a meal into a memorable experience. At first glance, the array of plates, glasses, and utensils might seem a little intimidating, but it all follows a surprisingly logical order—one designed to guide your guests effortlessly through multiple courses.
Let’s break it down. A formal setting is really just an expanded version of a casual one, built out to accommodate extra dishes like an appetizer, soup, salad, and dessert. It’s all about precision and balance, transforming your dining table from a functional surface into a beautiful tablescape that lets everyone know an exceptional meal is on its way.
The foundation is the same, as you can see from this quick overview of a casual setting. We’re just adding a few more layers.
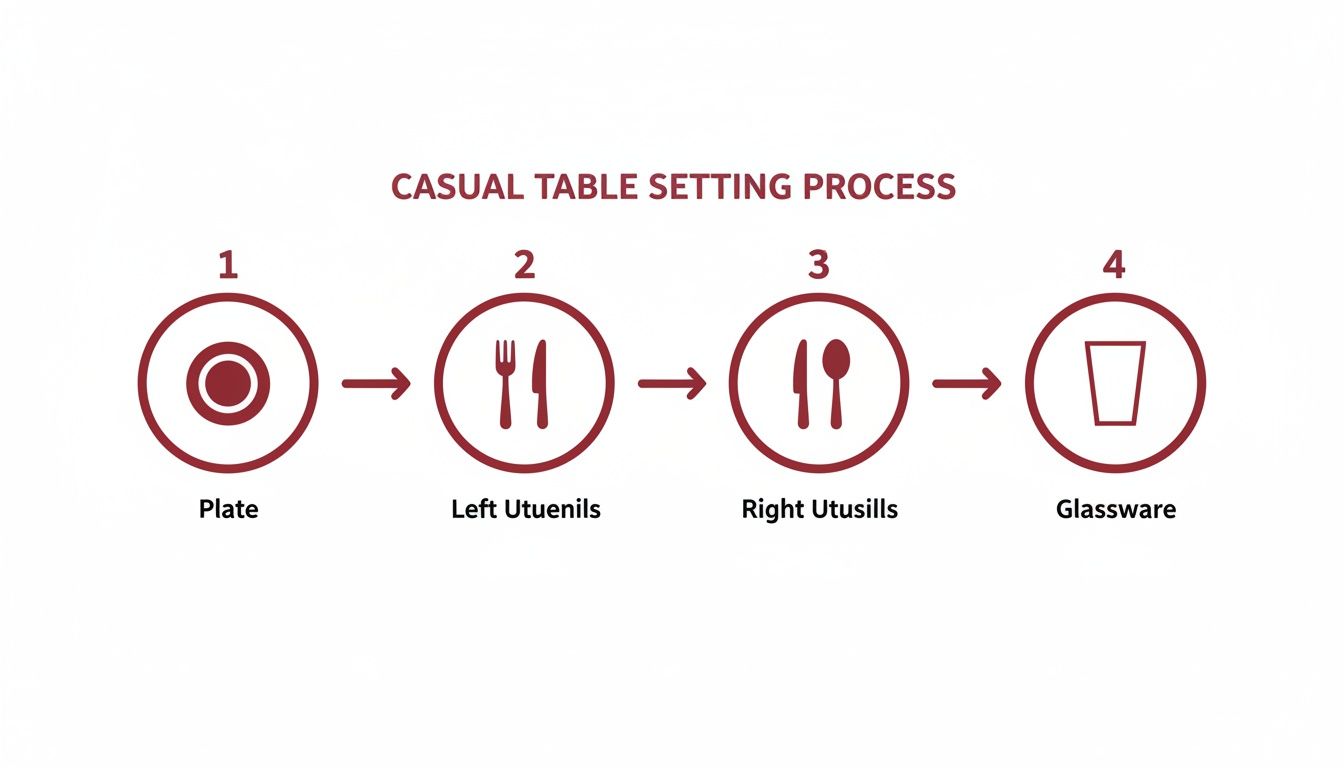
This simple sequence—plate, left utensils, right utensils, and glassware—is the core logic we’ll build on for our more elaborate formal arrangement.
The Anchor of the Setting: The Charger Plate
The most obvious signal of a formal dinner is the charger plate, also known as a service plate. This large, decorative plate is the foundation of the setting, serving as a base for the soup bowl and salad plate. It’s not for eating off of; instead, it adds a fantastic layer of color and texture until the main course arrives.
Chargers really frame the setting beautifully. While only about 21% of households might use them for regular hosting, that number jumps to 68% for holidays and formal events. Sizing is key for the right look: standard dinner plates are typically 26–28 cm, while chargers are a bit larger at 30–33 cm. Placing a 27 cm dinner plate on a 30 cm charger leaves a perfect 1.5 cm border.
A Note on Etiquette: The charger stays on the table for the soup and salad courses. It should be removed along with the last appetizer plate, just before the main entrée is served. You never want the charger on the table while guests are eating their main course.
Arranging the Full Suite of Utensils
A formal meal means more courses, which naturally means more utensils. The golden rule here is “outside-in.” Your guests will intuitively know which fork or spoon to use next because they’ll start with the outermost utensil and work their way inward toward the plate with each course.
- To the Left of the Plate: The dinner fork sits closest to the plate. Just to its left, you’ll place the salad fork. If there’s a fish course, the smaller fish fork goes to the left of the salad fork.
- To the Right of the Plate: The dinner knife goes right next to the plate, with its blade facing in. To its right, you might have a fish knife and then an appetizer knife. The soup spoon always sits on the far right. A great meal is made even better with quality cutlery, and if you’re looking to upgrade, our guide to the best knife sets for your home is a great place to start.
Make sure all the utensils are evenly spaced, with their bottoms aligning neatly with the bottom rim of the charger plate. I like to leave about an inch of space between the table’s edge and the handles of the flatware—it just looks cleaner.
Placement of Plates and Glassware
Beyond the charger, a few other key pieces have their own designated spots. Getting this right is what makes the setting look balanced and uncluttered, rather than crowded.
The Bread Plate
This small plate belongs at the top left of the setting, just above the forks. A small butter knife is laid horizontally across the top of the plate, handle on the right and blade facing left. It’s a simple touch, but it keeps guests from having to use their main plate for bread and butter.
Dessert Utensils
Dessert utensils are placed horizontally above the charger. The dessert spoon’s handle should point to the right, while the dessert fork’s handle points to the left. When dessert is served, your guests can easily pull them down into position on either side of their dessert plate.
The Glassware Array
For a formal dinner, you’ll likely have glasses for water, red wine, and white wine.
- The water goblet is positioned directly above the tip of the dinner knife.
- The red wine glass goes to the right of the water goblet.
- The white wine glass sits to the right of the red wine glass, but pulled slightly forward to form a neat triangle.
This arrangement isn’t just for looks; it’s also incredibly practical, allowing you (or a server) to pour beverages without awkwardly reaching over a guest’s plate.
Putting all these pieces together creates a dining experience that feels both luxurious and completely intuitive. It’s these thoughtful details that make an event truly unforgettable.
Adding Finishing Touches That Elevate Your Table
Okay, you’ve got the plates, glasses, and utensils perfectly placed. Now for the fun part—the creative details that actually bring your table to life. This is where you get to move beyond the “rules” of a proper place setting and inject some personality into your tablescape. These are the touches that transform a technically correct table into one that feels warm, inviting, and uniquely yours.
This final layer is all about expressing your personal style and making your guests feel truly special. From the centerpiece that anchors the whole look to the tiny detail of a place card, every choice contributes to the atmosphere of the meal.
Choosing the Perfect Centerpiece
The centerpiece is the heart of your table, but it should never be an obstacle. The most important rule of thumb? Keep it low enough for guests to easily see and talk to each other across the table. A good guideline is to make sure nothing in the center is taller than your guests’ forearms.
Here are a few ideas for centerpieces that feel right for any occasion:
- For a formal dinner: A low, linear flower arrangement or a series of small bud vases running down the middle of the table creates an elegant, connected feel.
- For a casual gathering: A cluster of pillar candles of varying heights, a rustic wooden bowl filled with seasonal fruit, or a collection of small potted herbs can feel incredibly cozy and approachable.
- For a family meal: Something simple and sturdy, like a vintage pitcher filled with wildflowers, is charming without being too precious.
Remember, a centerpiece doesn’t have to be just one thing. Grouping smaller objects together often creates more visual interest than one large, solitary arrangement.
Layering with Linens: Tablecloths, Runners, and Placemats
Linens are one of the simplest ways to add color, texture, and mood to your table. The choice between a tablecloth, runner, or placemats usually comes down to the formality of the event and the look you’re going for.
A full tablecloth instantly signals a more formal or traditional dinner. It creates a cohesive canvas and has the practical benefit of hiding a less-than-perfect table surface. For holidays and big celebrations, a classic white or ivory linen cloth is truly timeless.
A table runner is a wonderfully versatile option. It adds a strip of color and texture down the center while still letting the beauty of your tabletop—especially a nice wood or stone—show through.
Placemats are perfect for more casual settings. They define each person’s space and, let’s be honest, make cleanup a whole lot easier. For a modern, layered look, you can even place them on top of a tablecloth or runner.
Pro Tip: Don’t be afraid to mix things up. A textured runner over a solid tablecloth can add some real depth and sophistication. The key is to balance patterns and colors so the final look doesn’t feel too busy.
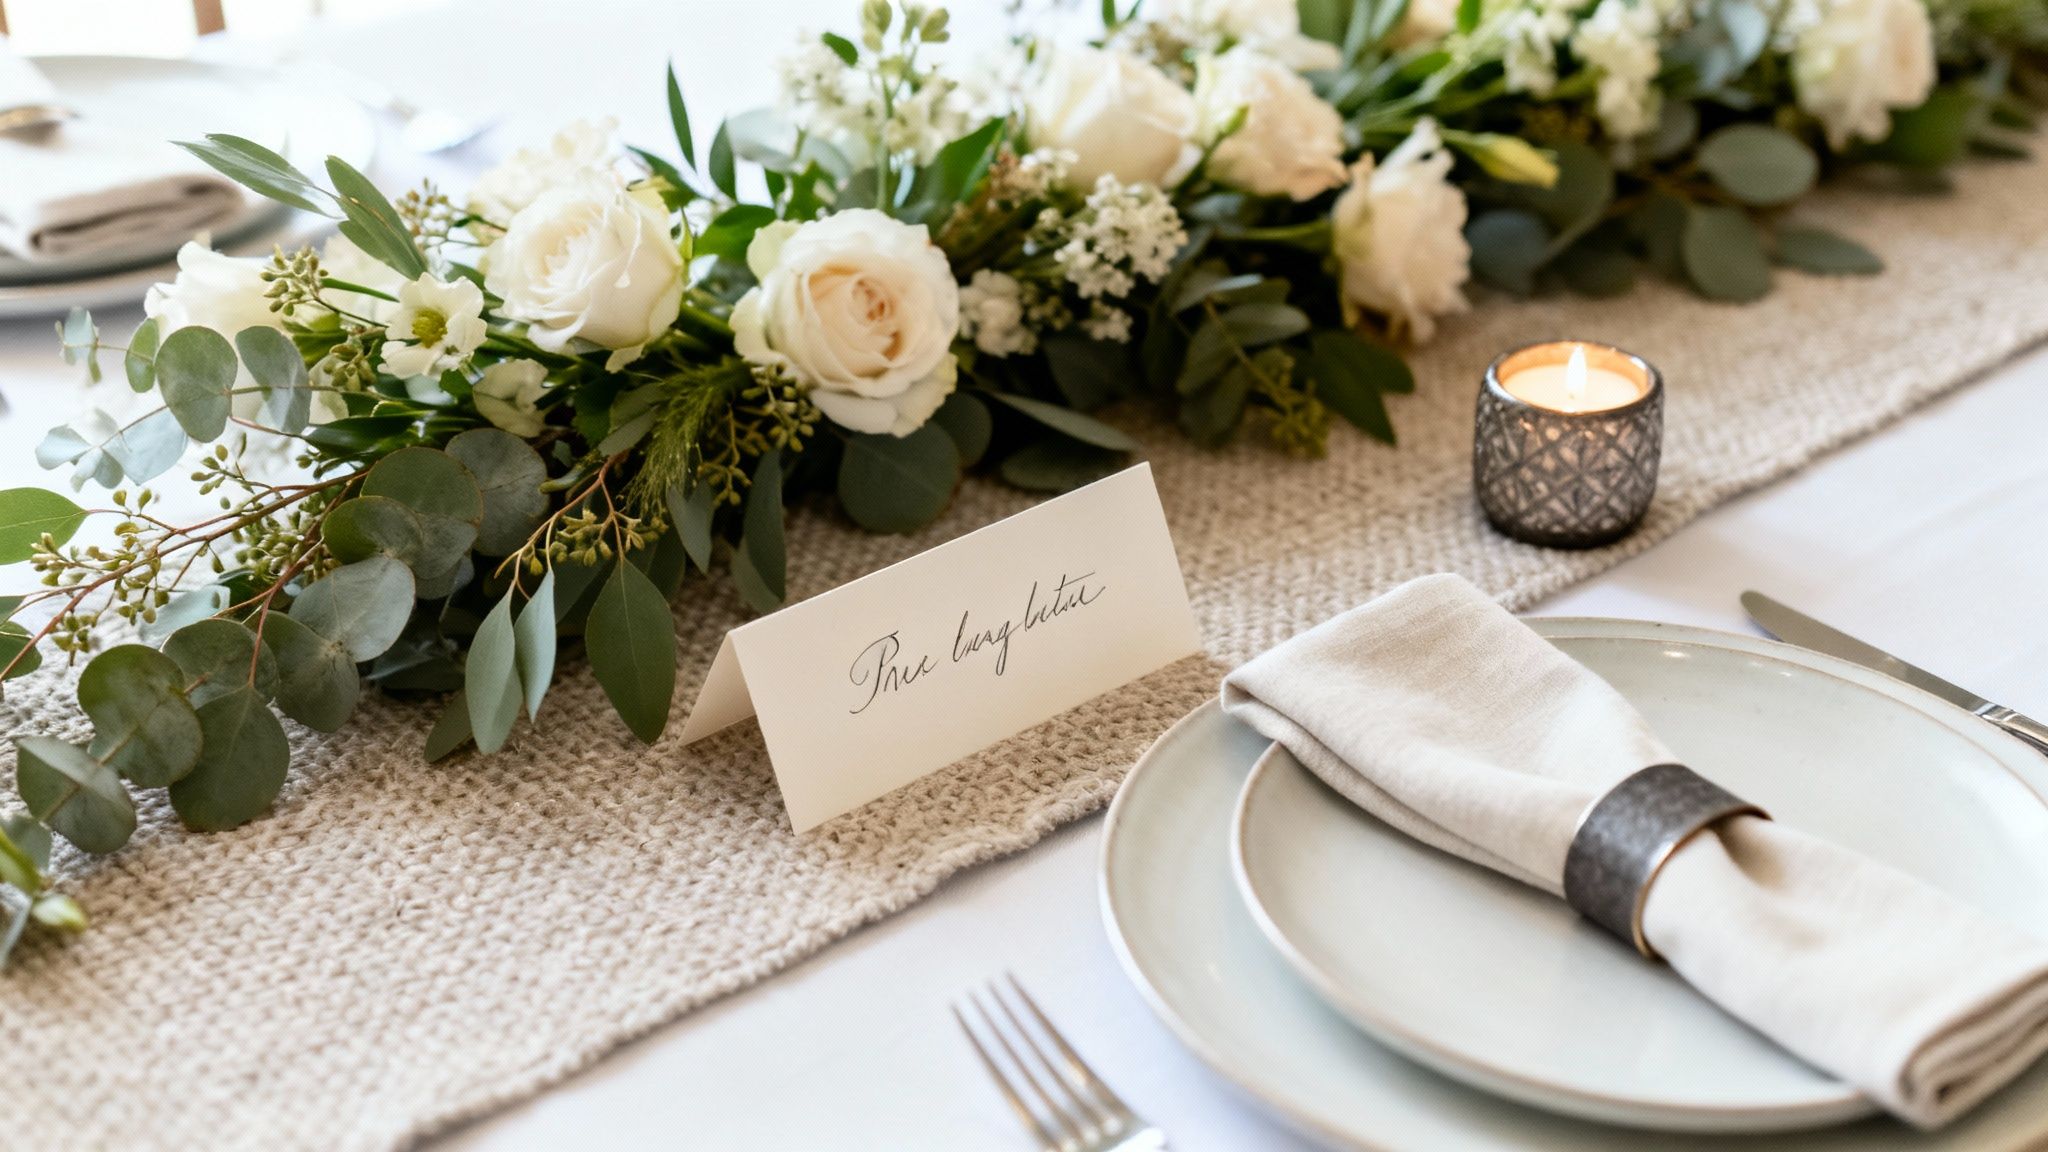
Personalizing with Place Cards and Napkin Rings
It’s the small details that make a huge impact. Place cards and napkin rings are fantastic opportunities to add a personal, creative flourish that your guests will definitely notice and appreciate.
Place cards are especially helpful for larger gatherings of eight or more people, as they completely eliminate that awkward “where should I sit?” shuffle. You don’t need to be a calligraphy expert, either; a simple, handwritten card is always charming. For a creative twist, try writing names on smooth stones, large leaves, or even small pieces of fruit like a pear or apple.
Napkin rings are like jewelry for your table. They come in countless materials, from polished metal and rustic wood to woven rattan. Choosing a ring that complements your dinnerware or the theme of your meal is a simple way to tie the whole look together. If you’re using stainless steel ones, keeping them shiny and fingerprint-free is key. We’ve got some great advice in our guide on how to clean stainless steel to make sure they always look their best.
By thoughtfully combining these elements, you create more than just a place to eat. You design an environment that tells a story and makes your guests feel both honored and completely at ease.
Answering Your Top Table Setting Questions
It’s one thing to look at a diagram, but it’s another thing entirely when you’re standing in your own dining room, trying to make it all work with your table and your dinnerware. Practical questions always come up in the middle of getting ready for guests.
Think of this as your quick-reference guide for those last-minute “wait, what do I do if…?” moments. Getting these details right will make the whole process feel less like a chore and more like the creative act it’s supposed to be.
How Much Space Should I Leave Between Place Settings?
This is one of the most important—and most overlooked—parts of setting a table. No one enjoys bumping elbows or feeling cramped. You want your guests to have enough room to breathe, eat, and gesture comfortably.
As a solid rule of thumb, aim for 24 to 30 inches of space from the center of one plate to the center of the next.
- For casual meals, 24 inches is usually perfect. It keeps the atmosphere cozy and encourages conversation without feeling crowded.
- For more formal dinners, especially when you have multiple glasses and extra silverware, leaning toward the 30-inch mark is a smart move. That extra breathing room keeps the setting from looking cluttered.
My favorite trick? After you’ve placed the first two settings, actually sit down in one of the chairs. Does it feel comfortable? Can you move your arms naturally? If it feels even a little tight to you, it will definitely feel tight to your guests. Adjust accordingly.
What If I Don’t Have All the “Right” Silverware?
This is a classic source of hosting anxiety, but the answer is wonderfully simple: don’t worry about it. The golden rule of modern table setting is about practicality, not showing off a massive collection of silver you never use.
Only set out the utensils your guests will actually need for the meal you are serving.
If there’s no fish on the menu, there is absolutely no reason to put out a fish fork. No soup? The soup spoon stays in the drawer. True hospitality is about making people feel comfortable and cared for, not sticking to some rigid, century-old rulebook.
The real key here is consistency. Use what you have, and make sure every place setting looks the same. A table set with thought and care, even with minimal silverware, is always far more elegant than one that’s technically “correct” but feels impersonal.
Should I Use a Tablecloth or Placemats?
The choice between a tablecloth and placemats really boils down to the vibe you’re going for. Neither is better than the other; they just set different tones for the meal.
- Tablecloths signal a more formal or significant occasion. They create a beautiful, unified canvas for your entire tablescape and can instantly elevate the feel of the dinner.
- Placemats are perfect for more casual get-togethers and everyday meals. They’re a breeze to clean, they clearly define each person’s space, and they let you show off the beautiful wood or finish of your table.
But you don’t always have to choose. For a really sophisticated, layered look, try using both. A textured placemat placed over a simple, solid-colored tablecloth adds a wonderful depth and visual interest. It’s a great way to blend the formality of a full cloth with the modern feel of a placemat.
Where Do the Dessert Utensils Go?
In a formal setting, the dessert fork and spoon have their own special spot. They are placed horizontally above the dinner plate.
The arrangement is very specific for a reason: the spoon’s handle should point to the right, and the fork’s handle should point to the left. This isn’t just for show; it’s designed to make it easy for guests to slide the utensils down into place on either side of their dessert plate when it arrives. It’s one of those small, thoughtful details that signals the meal is drawing to a sweet conclusion.
At Reva Housing, we believe that a well-informed host is a confident one. For more guides and reviews on everything from kitchen essentials to home decor, explore our resources at https://revahousing.com.