


To clean stainless steel, always wipe with the grain using a gentle cleaner and a microfiber cloth. After you’re done, it’s absolutely crucial to dry the surface completely. This simple two-step process prevents those annoying streaks and water spots, restoring its natural shine and forming the foundation for keeping your appliances looking brand new.
Why Stainless Steel Needs Special Care
Stainless steel is a cornerstone of modern kitchens, and for good reason. It’s durable, sleek, and brings a professional touch to everything from refrigerators and dishwashers to sinks and cookware. But as any homeowner knows, its beautiful finish is a magnet for fingerprints, smudges, and hard water spots.
The frustration is real, but the solution is surprisingly simple. It all comes down to understanding the material itself. Unlike a perfectly smooth sheet of glass, stainless steel has a subtle “grain”—faint, parallel brush marks left over from the manufacturing process.
Key Takeaway: The secret to a streak-free shine is always cleaning in the same direction as this grain. When you wipe against it, you’re essentially pushing residue and moisture into those tiny grooves, which is what causes streaks and a dull, hazy appearance.
Before you start scrubbing, it’s helpful to know the best approach. Here’s a quick rundown of the essential do’s and don’ts.
Quick Guide to Cleaning Stainless Steel
| Do | Don’t |
|---|---|
| Wipe with the grain. | Scrub against the grain. |
| Use microfiber cloths. | Use abrasive sponges or steel wool. |
| Use gentle, pH-neutral cleaners. | Use harsh chemicals like bleach or ammonia. |
| Dry the surface completely. | Let it air dry. |
| Buff with oil for extra shine. | Use cooking oil that can go rancid. |
Think of this table as your cheat sheet. Following these simple rules is half the battle won.
The Science Behind a Flawless Finish
Maintaining that pristine look is about more than just aesthetics; it’s about preserving the protective chromium oxide layer that gives stainless steel its famous corrosion-resistant properties. Using the wrong cleaners or abrasive tools can actually scratch and wear down this invisible shield, leading to permanent damage over time.
This widespread need for proper care has created a massive industry. The global market for stainless steel cleaners has already hit an estimated $2.41 billion, with regions like North America seeing steady growth. It just goes to show how many people are looking for the right way to maintain their investments.
This guide moves beyond generic advice to give you actionable techniques that actually work. Whether you’re dealing with everyday fingerprints on your fridge or stubborn water spots in your sink, the methods here will help you achieve professional results. We’ll also touch on what makes certain kitchenware brands, like those covered in our Henckels legacy review, so great at combining high performance with easy maintenance.
Gathering Your Cleaning Toolkit

Before you even think about tackling those fingerprints and water spots, let’s talk about getting your supplies in order. Having the right tools on hand is the secret to a flawless, streak-free finish—and, more importantly, to avoiding permanent scratches. Rushing in with the wrong stuff is a recipe for frustration.
The absolute, undisputed star of your toolkit is the microfiber cloth. Forget paper towels that leave lint behind or cotton dish towels that are surprisingly abrasive. Microfiber is a game-changer; its tiny fibers are designed to grab and trap grease, dirt, and moisture without scratching that delicate finish. You’ll want at least two—one for cleaning, one for drying and buffing.
Choosing Your Cleaning Solution
Once you’ve got your cloths, it’s time to pick your cleaner. You basically have two paths here: grabbing a commercial cleaner made specifically for stainless steel or whipping up a simple, effective DIY solution from things you already have at home.
- Commercial Cleaners: If you’re going the store-bought route, look for pH-neutral formulas. Anything too acidic or alkaline can damage the steel’s protective layer over time. I’ve found that the best options are often oil-based polishes. They do double duty: cleaning the surface and leaving behind a thin, protective barrier that helps repel future fingerprints. That means less cleaning for you later on.
- DIY Solutions: For a budget-friendly and natural approach, a few household staples work wonders. Honestly, a little mild dish soap and warm water is often all you need for daily wipe-downs to cut through light grease.
For a bit more cleaning muscle, a couple of pantry items are your best friends.
A spray bottle filled with a 50/50 mix of white vinegar and water is fantastic for degreasing and dissolving those chalky mineral deposits from hard water. The acetic acid in the vinegar just melts grime away.
For those really stubborn, caked-on messes (think the bottom of a sink or a burnt-on spot on a pan), a simple paste of baking soda and water offers gentle scrubbing power. It’s just abrasive enough to lift residue without scratching the heck out of the surface. With these basics, you’re equipped to handle pretty much any cleaning challenge your stainless steel throws at you.
Here’s the rewritten section, designed to sound completely human-written and natural, following all the provided requirements.
Your Everyday Stainless Steel Cleaning Routine
Okay, let’s move from theory to reality. This is where the real magic happens. A good, consistent cleaning routine is what keeps your stainless steel looking brand-new and prevents that annoying, stubborn buildup from ever taking hold. We’re not talking about a deep, hour-long scrub every day—just quick, smart maintenance that’s tailored to each surface.
Think about it: every stainless steel surface in your kitchen faces a different battle. Your fridge door is constantly under attack from fingerprints and smudges. Your sink is in a never-ending war with water spots and leftover food bits. And your cookware? It’s dealing with the intense stuff—heat, oil, and whatever you accidentally caramelized onto the bottom. Each one needs a slightly different touch.
Keeping Your Appliances Gleaming
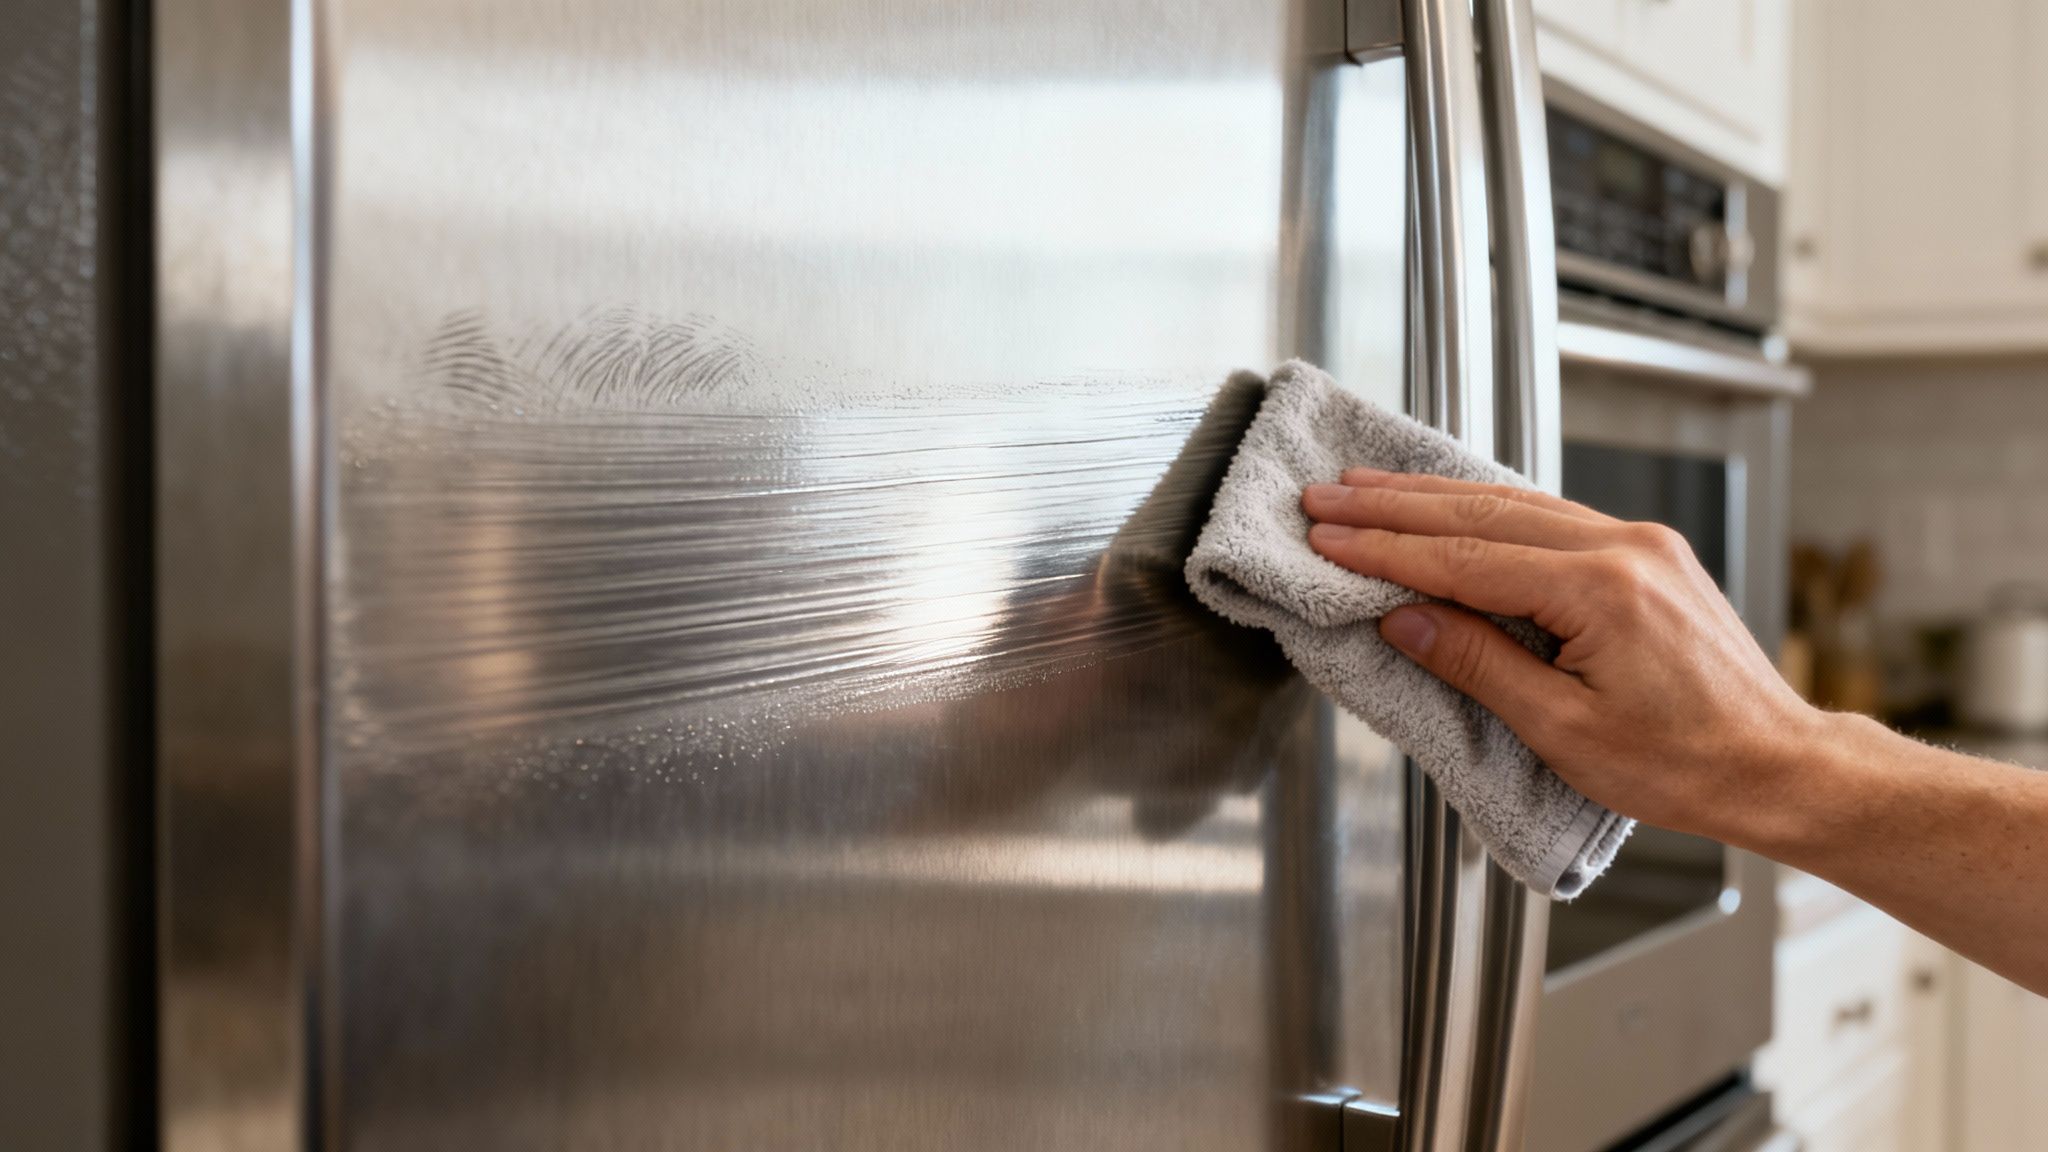
For those big-ticket items like your refrigerator, dishwasher, or microwave, the main villains are almost always streaks and fingerprints. The absolute best defense I’ve found is the classic two-cloth method. It’s ridiculously simple, lightning-fast, and works like a charm for daily upkeep.
First, grab a microfiber cloth and get it slightly damp with warm water. If you’re dealing with greasy fingerprints, add just a single drop of mild dish soap for a little extra cleaning power. Gently wipe down the surface, always moving in the direction of the grain to lift away smudges and grime.
Then, immediately follow up with a second, completely dry microfiber cloth. Buff the surface, again going with the grain. This step is the secret sauce—it’s non-negotiable. It whisks away any leftover moisture and is the key to that perfect, streak-free shine you’re after. The whole process takes less than a minute and makes a huge difference.
Sanitizing Sinks and Tackling Water Spots
Your kitchen sink is a total workhorse, and it definitely shows it. Between food scraps, soap scum, and hard water minerals, it can get dull in a hurry. For a daily clean, a quick once-over with a soft sponge and dish soap is usually all you need. But getting into the habit of a weekly sanitizing session is a great move.
After your normal cleaning, just spray the entire sink basin with a 50/50 mix of white vinegar and water. Let it sit for about five minutes. This will break down the mineral deposits that cause those pesky water spots. Then, give it a good rinse and—you guessed it—wipe it completely dry with a clean cloth.
Pro Tip: For a deeper clean that also buffs out minor scuffs, try making a simple paste of baking soda and water. Gently scrub the whole sink with it, then rinse and dry. It leaves the surface looking incredibly bright and feeling smooth.
Daily Care for Stainless Steel Cookware
The best way to avoid having to chisel burnt-on food off your stainless steel cookware is to clean it properly right after you use it. The cardinal rule: never, ever plunge a hot pan into cold water. That’s a recipe for warping.
- Cool Down First: Always let your pot or pan sit for a few minutes to cool down.
- Gentle Scrub: Use warm, soapy water and a non-abrasive sponge to wash it. If you have some stubborn food stuck on, just fill the pan with an inch of water, add a little soap, and let it simmer on the stove for a few minutes. The gunk will lift right off.
- Dry Completely: Always dry your cookware by hand. This prevents water spots and keeps that beautiful luster intact.
This simple daily routine ensures your cookware performs at its best for years. Knowing how to care for your major appliances and tools is just as crucial as picking the right ones in the first place. These same principles—quick, correct cleaning—extend the life and performance of smaller items, too, like the ones covered in this guide on KitchenAid’s blenders. At the end of the day, consistency is your best friend for a sparkling kitchen.
DIY vs Commercial Stainless Steel Cleaners
When it comes to choosing a cleaner, you’ve got options. You can go the homemade route with things you probably already have in your pantry, or you can grab a specialized commercial product off the shelf. Both have their pros and cons, and what’s “best” often comes down to the job at hand and your personal preference.
Here’s a quick breakdown to help you decide:
| Factor | DIY Cleaners (Vinegar, Baking Soda) | Commercial Cleaners |
|---|---|---|
| Cost | Extremely low. You likely already own the ingredients. | Higher cost. Specialized formulas come with a bigger price tag. |
| Effectiveness | Great for daily cleaning, smudges, and water spots. May require more elbow grease for tough jobs. | Highly effective on grease, heavy buildup, and often contain polishing agents for a superior shine. |
| Convenience | Less convenient. Requires mixing solutions and sometimes multiple steps (e.g., paste application). | Very convenient. Ready to use right out of the bottle, usually in a spray format. |
| Safety | Generally food-safe and non-toxic, with no harsh fumes. | Check labels carefully. Some contain strong chemicals and require good ventilation. |
Ultimately, there’s a place for both in your cleaning arsenal. For quick, everyday wipe-downs, a simple vinegar and water spray is tough to beat for its cost and safety. But when you need to tackle heavy-duty grease or want that showroom-perfect polish, a good commercial cleaner can be a real time-saver.
How to Remove Tough Stains and Scratches
Even with a solid daily wipe-down, some messes just don’t want to cooperate. I’m talking about the built-up grease that feels sticky to the touch, those chalky hard water deposits that cloud up your sink, and the dreaded scratch that seems to catch your eye every time you walk past. It can feel like your stainless steel has lost its shine for good.
Don’t panic. With the right approach, you can absolutely tackle these stubborn issues without wrecking the finish.
These techniques take a little more elbow grease, but they work. The trick is to match the solution to the specific problem. But before you start, always remember the golden rule of cleaning: test any new method on a small, hidden spot first. The inside of a sink basin or the side of an appliance that faces the wall are perfect test subjects.
To make things even easier, here’s a quick visual guide to help you pick the right cleaning path for your surface.
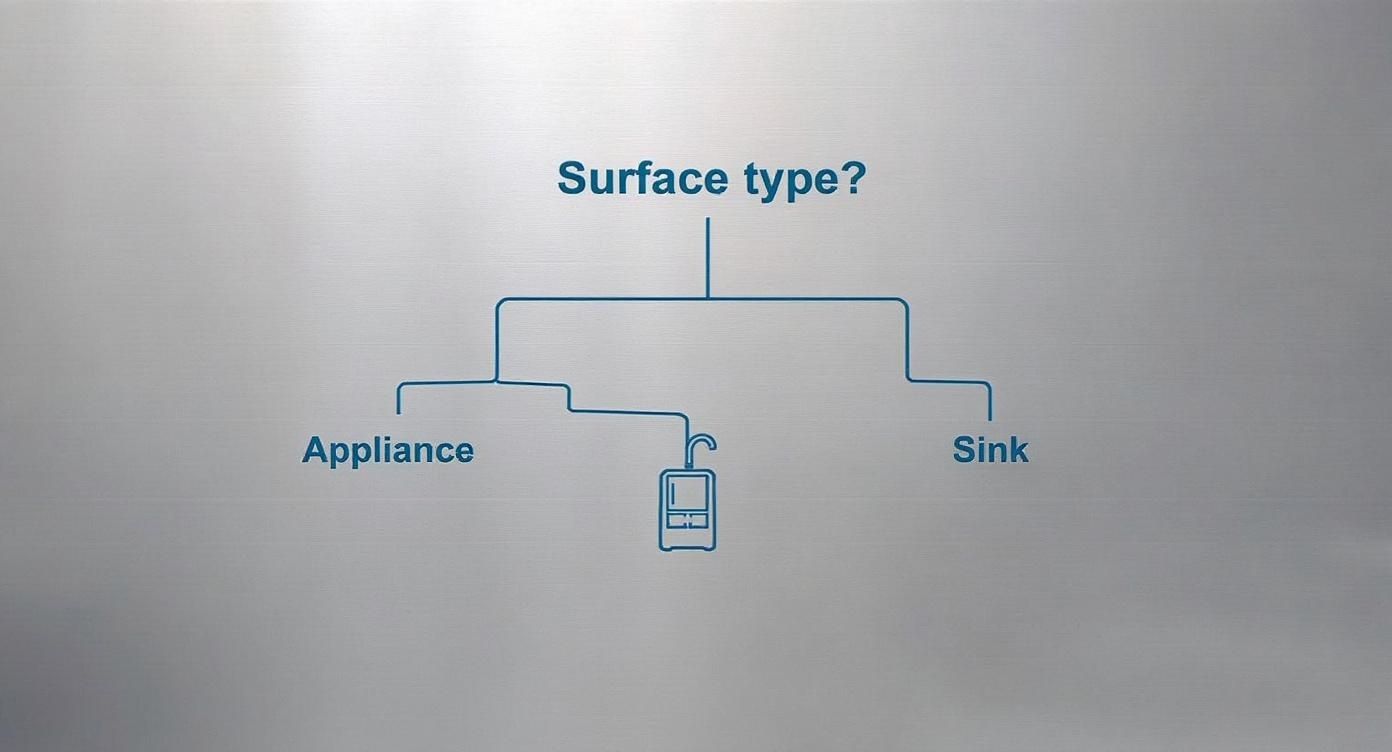
As you can see, the best approach often depends on whether you’re dealing with an appliance or a sink.
Tackling Hard Water Spots
Those cloudy, white splotches you see, especially in sinks and on dishwasher doors, are just mineral deposits left behind when water evaporates. A simple soap-and-water scrub won’t do much because you need a mild acid to dissolve them.
This is where plain old white vinegar is your best friend. Soak a microfiber cloth in undiluted white vinegar, lay it flat over the stained area, and just let it sit for 15-20 minutes. This gives the acetic acid enough time to work its magic and break down the minerals.
Afterward, lift the cloth, give the area a gentle scrub (always with the grain!), and rinse it really well with water. Dry it completely to keep new spots from forming right away.
Banishing Stubborn Grease Buildup
Grease has a way of building up, especially on a range hood or the sides of a stove, until it becomes a sticky, stubborn mess. For this job, you need a degreaser that’s strong enough to cut through the gunk but gentle enough not to scratch the steel. Baking soda is perfect.
Make a thick paste by mixing baking soda with a little warm water. Slather it directly onto the greasy spots and let it sit for 10-15 minutes. The alkaline nature of the baking soda will start breaking down the grease on its own. Then, using a soft, damp cloth, wipe the paste away—again, always moving with the grain. A final rinse and thorough dry will leave it looking great.
Dealing with Fine Scratches and Rust
Finding a scratch or a tiny rust spot can be gut-wrenching, but don’t worry—minor blemishes are often fixable.
- For Fine Scratches: This requires a bit of specialized gear. You’ll need a stainless steel scratch removal kit. These kits usually include a few abrasive pads of varying grits and a polishing compound. You have to follow the product’s instructions to the letter, as the process involves carefully buffing with the grain to blend the scratch into the surrounding finish. It takes some patience, but it can make a world of difference on minor scuffs.
- For Minor Rust Spots: These pop up a lot in sinks, usually from a wet can or metal utensil left sitting too long. Make a paste of baking soda and water, apply it to the rust spot, and let it sit for about 30 minutes. Using a non-abrasive sponge, scrub gently in the direction of the grain, then rinse and dry. The mild abrasive quality of baking soda is typically all you need to lift surface rust without damaging the steel underneath.
Proactive Maintenance for Lasting Shine
Honestly, the best way to keep your stainless steel looking brand new is to stop messes before they happen. If you can shift your mindset from reacting to spills and smudges to proactively maintaining the finish, you’ll slash your scrubbing time and keep that beautiful gleam for years. It’s all about building a few simple habits.
Think of it like seasoning a cast-iron skillet—a little preventative care makes all the difference. This isn’t about heavy-duty cleaning sessions. It’s about quick, consistent actions that prevent fingerprints, water spots, and acidic foods from ever getting a foothold. It’s the real secret to an easier cleaning routine.
Create a Protective Barrier
One of the biggest complaints I hear about stainless steel is how it’s a magnet for fingerprints, especially on a busy refrigerator. A fantastic little trick I picked up years ago is to use a micro-thin layer of oil as an invisible shield.
After cleaning and drying your appliance completely, put a tiny dab of food-grade mineral oil or even baby oil on a clean microfiber cloth. Gently wipe it onto the surface, always moving with the grain. Then, grab a second, dry cloth and buff it until there’s no oily feeling left. This simple step creates a barrier that makes it much harder for smudges to stick and way easier to wipe them away later.
Key Insight: This oil barrier does more than just repel fingerprints. It also fills in the microscopic grooves in the steel’s grain, giving the surface a deeper, more uniform shine. It’s a two-minute task that can save you from daily wipe-downs.
Win the War Against Water Spots
For stainless steel sinks, the main enemy is hard water. When water evaporates, it leaves behind mineral deposits that create those chalky, dull spots. The fix is incredibly simple but requires a bit of consistency: rinse and dry your sink after every use.
I know, it sounds a bit tedious, but it takes less than 30 seconds. After you’re done with the dishes, just give the sink a final spray with clean water and a quick wipe-down with a dedicated microfiber cloth. This stops the minerals from ever settling on the surface, preventing water spots before they even have a chance to form.
Act Fast on Acidic Spills
Some of the most damaging things for stainless steel are everyday kitchen acids. Spills from tomato sauce, lemon juice, coffee, or wine can permanently etch the surface if left to sit for too long. The acid literally eats away at the protective layer that keeps the steel from corroding.
Get into the habit of wiping up these kinds of spills immediately with a damp cloth. That quick response is your best defense against permanent discoloration or dull spots. Of course, having the right tools on hand makes all the difference. For more insights on choosing high-performance tools, our guides on premium kitchenware can be a big help.
This focus on using the right products is a big deal. The global market for food-grade stainless steel cleaners is valued at around $1.5 billion, which really highlights how critical proper maintenance is for preventing bacterial growth and keeping kitchen environments safe. You can dig into these market trends and findings on archivemarketresearch.com if you’re curious.
Common Questions About Cleaning Stainless Steel
Even when you have the basics down, stainless steel has a way of throwing a few curveballs. It’s a unique material, and what works for glass or ceramic tile often does more harm than good here. Let’s clear up some of the questions I hear all the time so you can clean with total confidence.
Getting these details right is the difference between a quick, satisfying shine and a frustrating afternoon trying to buff out streaks—or worse, new scratches.
Can I Use Windex on My Stainless Steel Appliances?
This is a big one, and the answer is a hard no. It seems like a quick fix for fingerprints, but glass cleaners like Windex are a huge mistake for stainless steel.
Most of them contain ammonia or other harsh chemicals that can strip the protective layer right off the steel’s surface. Over time, this leads to permanent discoloration and can even make your appliances more likely to rust. Stick with pH-neutral options like mild dish soap or a simple vinegar and water solution instead. It’s so much safer.
What Does “Cleaning With the Grain” Actually Mean?
If you look really closely at your stainless steel fridge or dishwasher, you’ll notice a pattern of very fine, parallel brush marks running in one direction. That’s the “grain.” Cleaning “with the grain” just means wiping your cloth in that same direction, not against it or in little circles.
Why It Matters: Wiping against the grain shoves cleaning residue and tiny bits of dirt deep into those grooves. That’s one of the main reasons people end up with streaks and a dull-looking finish. Following the grain gives you a smooth, clean wipe and helps you avoid creating tiny, visible scratches.
How Can I Stop Fingerprints From Showing Up on My Fridge?
You can’t make your appliances completely fingerprint-proof (we can dream, right?), but you can make smudges way less noticeable and a lot easier to wipe away. The secret is to create a thin, protective barrier right after you’ve cleaned and dried the surface.
- Apply a Thin Coat of Oil: Grab a clean microfiber cloth and put a few drops of food-grade mineral oil or even baby oil on it. A little goes a long way.
- Wipe With the Grain: Gently rub the oil onto the surface, always following the direction of the grain.
- Buff It Out: Use a second, clean, dry cloth to buff the surface until there’s no oily residue left. It should just look clean and polished.
This invisible layer helps repel the natural oils from your fingertips, which dramatically cuts down on how obvious smudges look.
Is It Safe to Use an Abrasive Sponge?
Absolutely not. Please, never use abrasive tools like steel wool, scouring powders, or even the rough side of a kitchen sponge on your stainless steel. These materials are far too aggressive and will leave behind permanent scratches that completely ruin the finish.
For day-to-day cleaning, a soft microfiber cloth is all you need. If you’re tackling some tough, burnt-on gunk on a pot or pan, make a gentle scrubbing paste with baking soda and water. It gives you just enough friction to lift the grime without causing damage, keeping your steel looking great for years.
At Reva Housing, we believe that maintaining your home shouldn’t be a chore. With the right knowledge and tools, you can keep every part of your living space looking its best. For more in-depth reviews and practical guides on everything from kitchenware to garden essentials, explore our latest articles at https://revahousing.com.
Article created using Outrank
5 Comments
Pingback: Finding the Best Frying Pan for Your Gas Cooktop: The All-Clad D3 Stainless Steel Skillet
Pingback: Propane vs Gas Grill: The Ultimate Grilling Showdown
Pingback: The Ultimate Guide to the Best Ice Makers for Home Use in 2024
Pingback: The Fiskars PowerLever Softgrip Hedge Shears: Your Go-To Tool for a Tidy Garden
Pingback: The Solo Stove Bonfire 2.0: Is This The Ultimate Backyard Fire Pit?